Witch Finger Pretzels


This post may contain affiliate links. Please read our full disclosure policy.
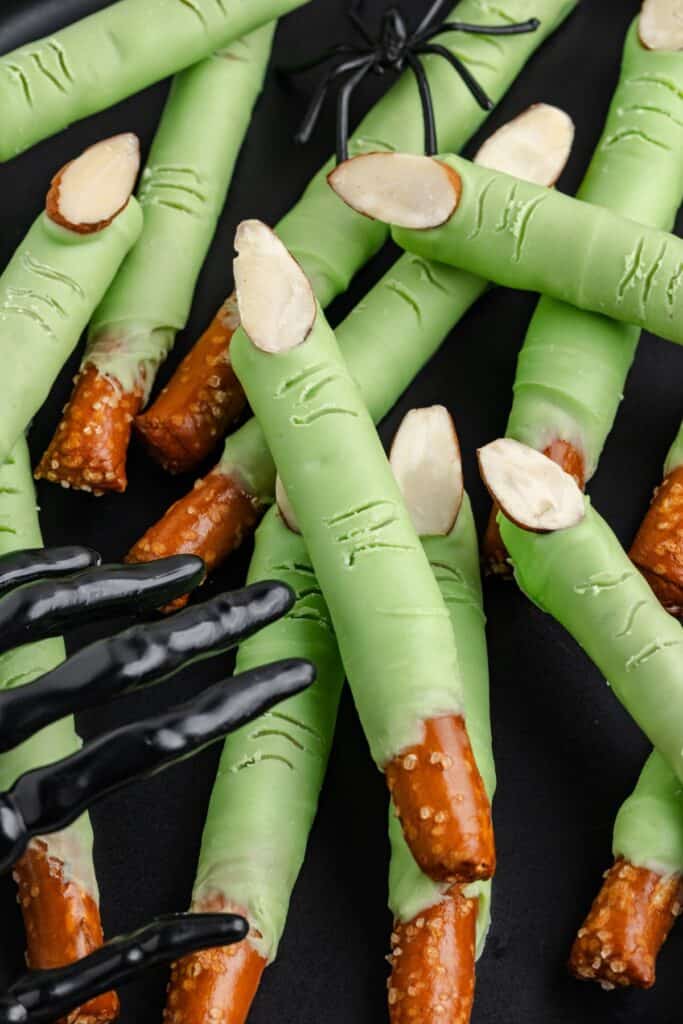
These Witch Finger Pretzel Rods are an easy and spooky Halloween treat made with candy melts, almonds, and pretzels. The green coating and almond “fingernails” give them a creepy look that’s perfect for parties, snack boards, or classroom goodies.
Easy Halloween Pretzel Rods
Halloween has always been one of my favorite holidays, especially since moving to the U.S. Growing up in New Zealand, it wasn’t something we celebrated, so once I got the chance, I went all in with decorations, costumes, and especially the themed treats.
I’m definitely on team cute Halloween rather than spooky, and these Pretzel Witch Fingers fit right in. They’re playful, colorful, and easy to make with kids, making them one of my favorite party snacks.
What I love most is that they’re completely no-bake, just like my Graveyard Pudding Cups and Oreo Bat Truffles, so I can prep them ahead of time without turning on the oven. The candy melts coat the pretzels perfectly, and the sliced almonds, as fingernails, add the right amount of Halloween flair without being too creepy.

Ingredients
- Pretzel rods – Serve as the sturdy base and give a salty crunch.
- Light green candy melts – Provide a smooth coating and fun witchy color.
- Sliced almonds – Mimic fingernails for the spooky finger look.

How to Make the Halloween Pretzel Treats
- Prep – Line a small rimmed baking pan with parchment paper for the melted candy coating. Line a second tray with parchment paper for the finished pretzels. Break each pretzel rod in half.
- Melt the candy – Melt the candy melts according to the package instructions until smooth. Pour into the parchment-lined rimmed pan and let it settle into a thick puddle.
- Coat the pretzels – Roll each broken pretzel half in the melted candy, making sure the snapped end is fully covered. Tap off any excess.

- Add the fingernail – Press a sliced almond onto the coated tip to create the nail, then place it on the second tray.
- Chill briefly – Refrigerate the tray for about 5 minutes until the coating is mostly set but still soft to the touch.
- Add knuckle lines – Use a toothpick to gently draw lines into the coating to create a knuckle effect.
- Let set completely – Return the tray to the fridge or let sit at room temperature until the coating is fully hardened before serving.

Variations and Substitutions
There aren’t a lot of variations for this recipe since it’s so simple, but there are a few fun ways to customize it.
- Nut-free option – If you have a nut allergy, replace the almond with a small fingernail shape sculpted from fondant.
- Creepier nails – Brush the sliced almonds with black food coloring before attaching them for a more dramatic, spooky effect.
- Different colors – Use purple, orange, or classic green candy melts to match your Halloween theme
- Add sparkle – Lightly dust the finished coating with edible shimmer or sanding sugar for a playful twist.
- Extra detail – Use an edible marker to add tiny cracks or lines to the nails once they’ve set.

Tips for Success
- Use fresh pretzel rods – Older pretzels can break too easily when snapped in half.
- Don’t overheat the candy melts – Melt them slowly to keep the texture smooth and avoid clumping.
- Let the coating settle – Pouring the candy melts into a shallow puddle makes it easier to roll the pretzels evenly. This is the same technique I used for my Football Pretzel Rods.
- Work in batches – If you’re making a large batch, melt the candy in smaller portions to keep it workable.
- Chill just enough – Refrigerate briefly before drawing knuckle lines so the coating is firm but not fully set.

Want to be the first to know when the next fun Halloween recipe is published? Sign up for our newsletter updates below.
More Fun Halloween Treats
These playful recipes are perfect for Halloween celebrations.
Did you love the pretzel witch fingers?? Please leave a star rating and share your thoughts in the comments below.

Witch Finger Pretzels Recipe
Ingredients
- 12 pretzel rods
- 1 (12-ounce) bag light green candy melts
- 1/3 cup sliced almonds
Instructions
- Line a small rimmed baking pan with parchment paper for the candy coating. Line a second tray with parchment paper for the finished pretzels. Break each pretzel rod in half.
- Melt the candy melts according to package instructions until smooth, then pour into the parchment-lined rimmed pan. Let it settle into a thick puddle.
- Roll each pretzel half in the melted candy, making sure the snapped end is completely coated. Tap gently to remove excess.
- Press a sliced almond onto the tip of each coated pretzel to form the fingernail, then place on the second tray.
- Chill the pretzels in the fridge for about 5 minutes, just until the coating is semi-set but still soft.
- Use a toothpick to draw knuckle lines into the coating.
- Return to the fridge or let sit at room temperature until the candy coating is fully set before serving or storing.
Notes
- Store in an airtight container at room temperature for up to 1 week.
Nutrition
Disclaimer: Nutrition information is estimated based on automated calculations and should be considered as an approximation. These estimates are provided as a courtesy. Please use your own brand’s nutritional values to verify accuracy.