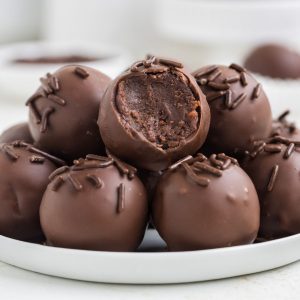
Easy Brownie Truffles


This easy brownie truffles recipe starts with a box of brownie mix and transforms into rich, chocolate-dipped bites with the help of cream cheese and melting wafers.
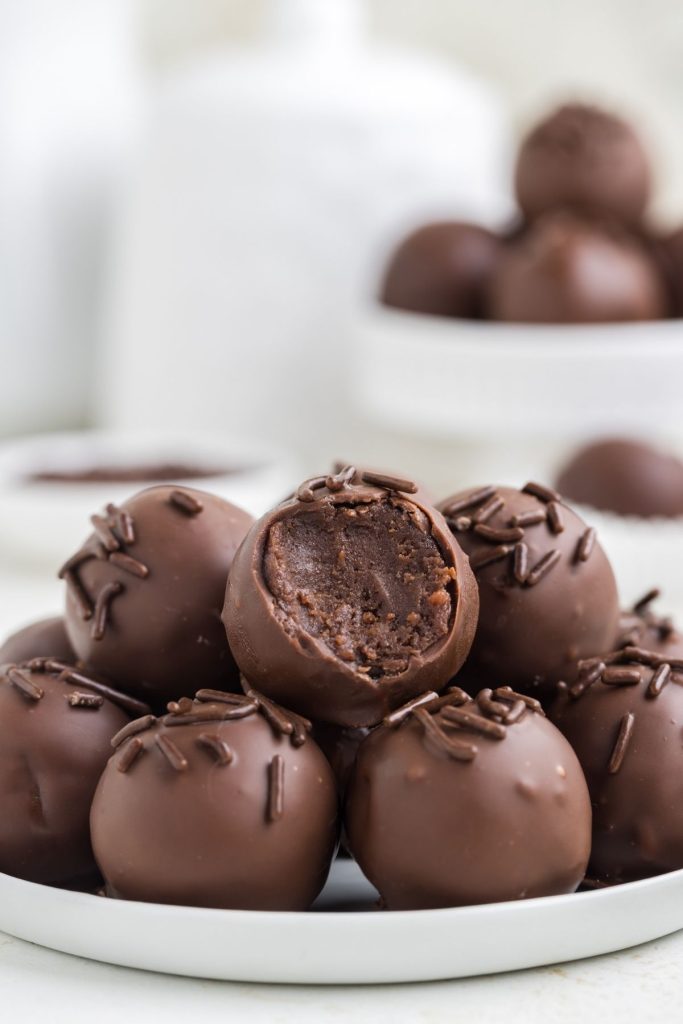
Chocolate Brownie Truffles
I love making cream cheese truffles because they look so fancy, but they’re surprisingly simple. These brownie truffles are extra fudgy thanks to the boxed brownie base, and that rich texture makes them feel even more special than my usual cookie-based versions like my Gingerbread Truffles or Oreo Cookie Truffles.
I like using the full 8 ounces of cream cheese because it makes the truffles super creamy and smooth, but if you’re after a slightly firmer texture, you can scale it back to four ounces. These are one of my favorite things to gift for holidays like Valentine’s Day, Mother’s Day, and Christmas. I usually pop each one into a mini cupcake liner and pack them into a kraft box tied with ribbon.
My Lemon Oreo Truffles and Baileys Truffles also make great homemade gifts!
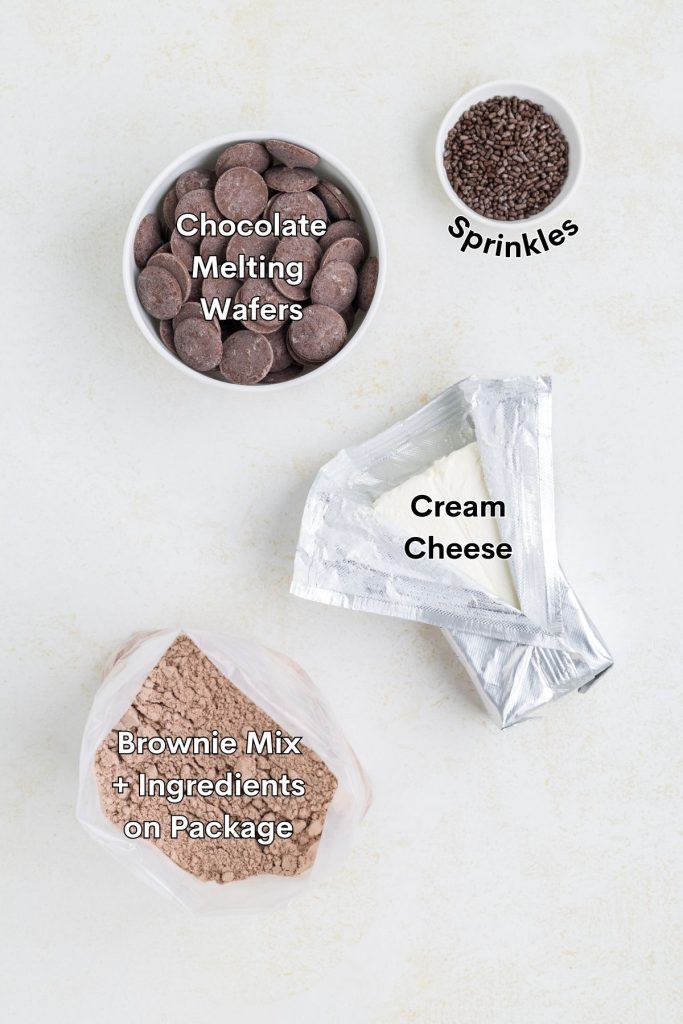
Ingredients
- Box brownie mix + ingredients listed – Creates a rich, chocolatey base that’s soft and fudgy. I used Duncan Hines Chewy Fudge Brownies mix.
- Cream cheese – Adds creaminess and helps hold the truffles together
- Chocolate melting wafers – For smooth, easy truffle coating.
- Sprinkles – Optional, but great for adding a festive touch and hiding flaws.
Making the Brownie Truffles
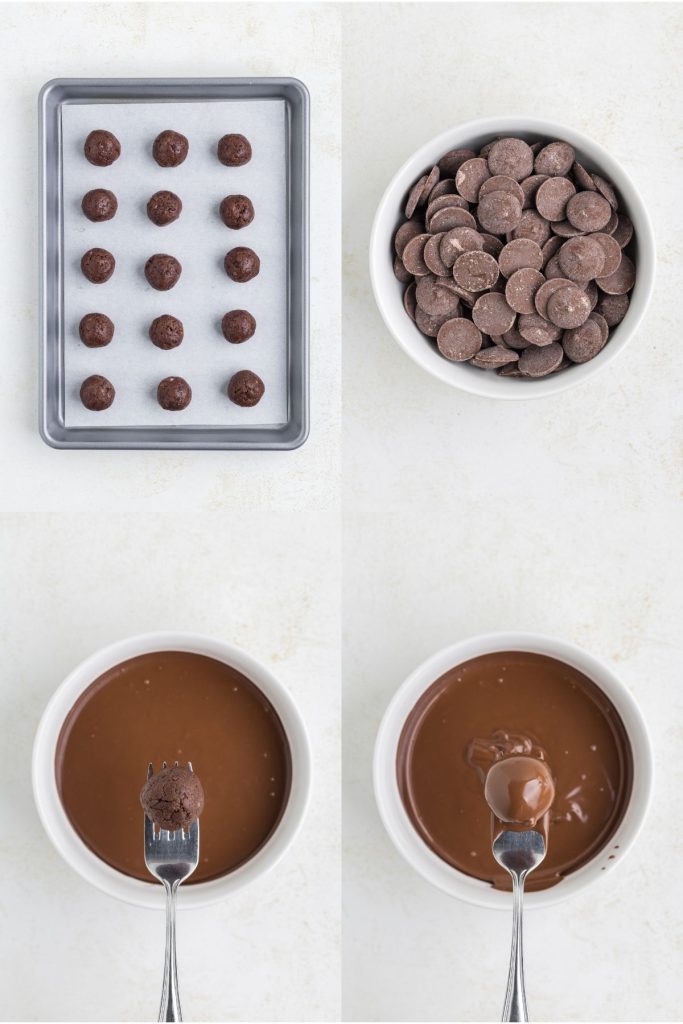
- Prepare the brownies: Bake the brownies in a 9×13-inch pan by following the package directions. Allow the brownies to cool completely.
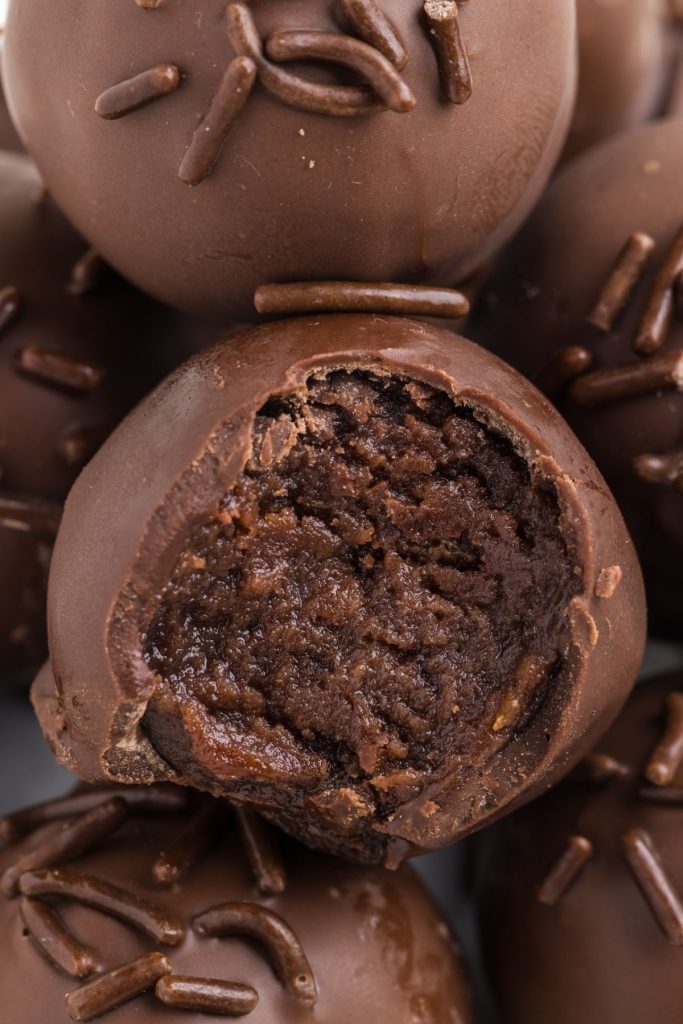
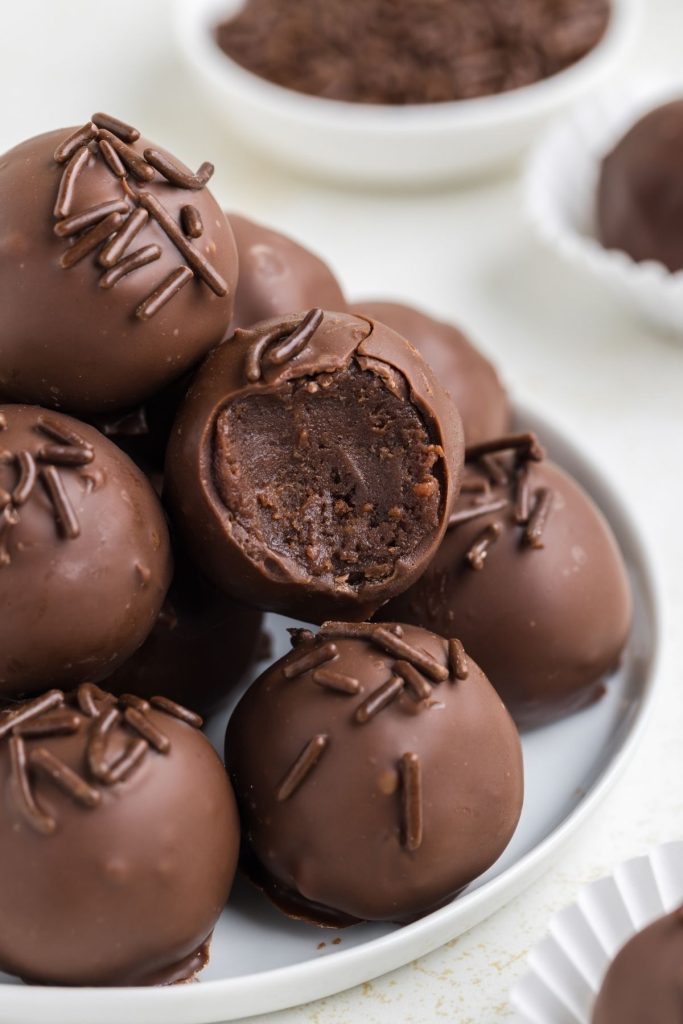
- Scoop and mix – Scoop the baked brownies into a large bowl, leaving the crispy edges behind. Add cream cheese and beat with a hand or stand mixer until well combined, ensuring no lumps remain.
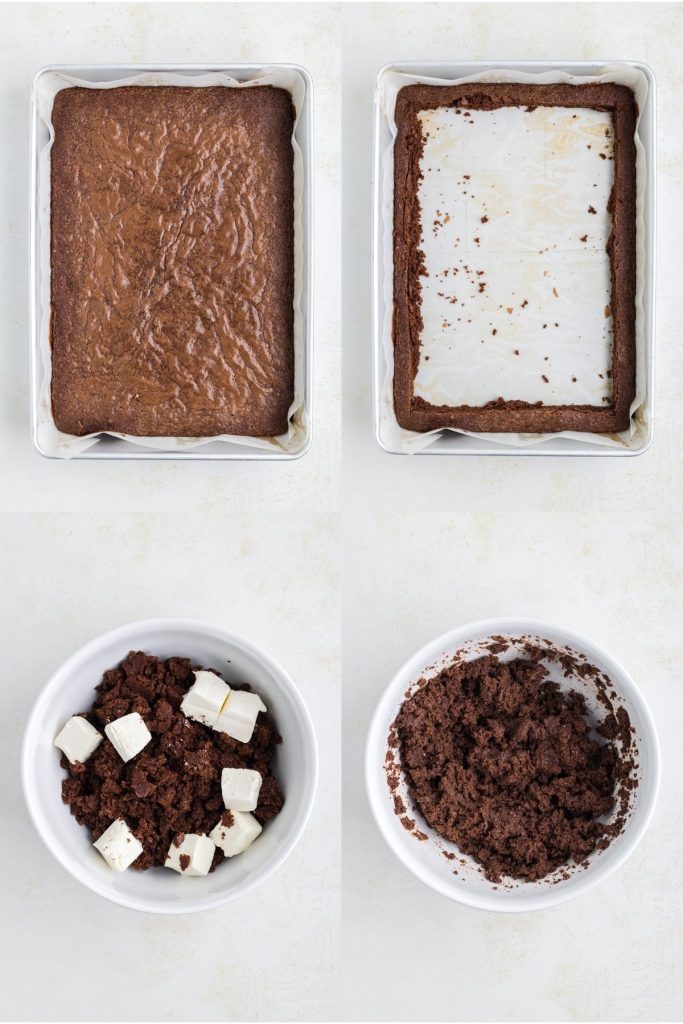
- Shape and freeze – Roll the brownie mixture into 1 tablespoon-sized balls, placing them on a parchment-lined baking sheet. Freeze for 30 minutes or until solid.
- Melt the chocolate – Once the truffles are frozen, melt the chocolate wafers in a microwave-safe bowl in 20-second intervals until smooth.
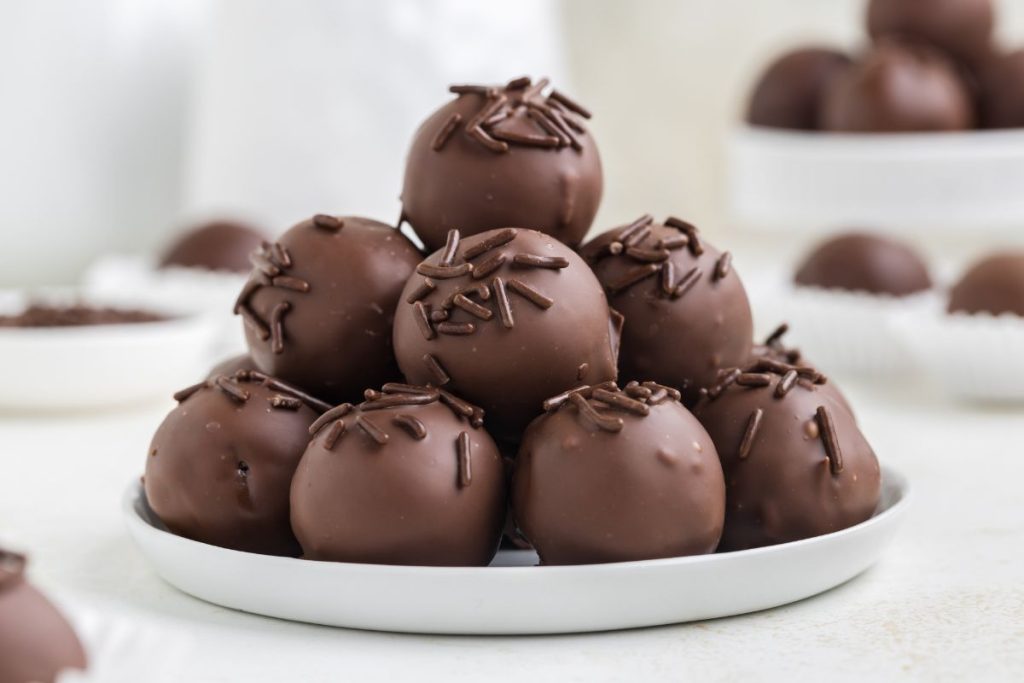
- Coat and decorate – Use a fork to dip the frozen truffles in the melted chocolate, coating them evenly. Tap the fork gently to shake off excess chocolate before returning to the baking sheet. Immediately top with sprinkles.
- Set in the refrigerator – Place the truffles in the fridge for 15-20 minutes to allow the chocolate coating to set.
Variations and Substitutions
- Homemade brownies – Instead of a box mix, use your favorite brownie recipe for a personalized touch.
- Adjust cream cheese – Tailor the texture to your preference by reducing the amount of cream cheese. Use less for a firmer, less creamy truffle that lets the brownie flavor shine. If using homemade brownies, start with 4 ounces and add more as needed.
- Real chocolate coating – Substitute chocolate wafers with real chocolate for the coating. Add 1-2 teaspoons of vegetable shortening or oil to the melted chocolate to help achieve a smooth consistency. While real chocolate may result in a slightly thicker texture and a different finish compared to melting wafers, the richer taste it imparts is well worth it.
- Add mix-ins – Stir in mini chocolate chips, crushed nuts, or cookie crumbs before rolling into balls for extra texture.
- Match the holiday – For festive occasions like Valentine’s Day or Christmas, coat the truffles in different colored melting wafers to match the holiday theme. Use colored sprinkles, crushed candy canes, mini marshmallows, or edible glitter to match different holidays.
Tips for Success
- Room temperature cream cheese – Ensure your cream cheese is at room temperature before incorporating it into the brownie mixture. This ensures a smoother blend and avoids lumps in the truffle mixture.
- Bake brownies in a 9×13 pan – Opt for a 9×13 inch pan when baking the brownies. This reduces bake time and facilitates quicker cooling, expediting the truffle-making process.
- Consistent ball size – Maintain uniformity by using a tablespoon to measure the brownie mixture, ensuring consistent truffle sizes. This ensures even freezing and coating.
- Freeze truffles before dipping – After shaping the brownie mixture into balls, freeze them for at least 30 minutes before dipping them in chocolate. This step makes the truffles firmer and easier to handle, preventing them from falling apart during the coating process.
- Use parchment paper – Place the truffles on parchment-lined baking sheets when freezing and setting them. This prevents sticking and makes cleanup easier.
- Decorate immediately after dipping – Since the chocolate coating sets quickly, sprinkle the truffles with toppings or decorations immediately after dipping them in chocolate to ensure they adhere.
Want to be the first to know when the next chocolate lover’s dream recipe is released? Sign up for our newsletter updates below.
Love brownie mix desserts?
Check out these easy chocolate recipes.
Did you love these brownie cream cheese truffles? Let me know your thoughts in the comments below.
Easy Brownie Truffles Recipe
Ingredients
- 1 (18 ounce) box of brownie mix + ingredients listed on box
- 8 ounces full-fat, brick-style cream cheese room temperature
- 3 cups chocolate melting wafers
- sprinkles for decorating
Instructions
- Prepare the brownies in a 9×13 inch pan according to the package directions. Allow the brownies to cool completely.
- Scoop out the baked brownies into a large bowl leaving the firmer edges behind.
- Add the cream cheese to the brownies and beat with a hand or stand mixer until well combined and no lumps of cream cheese remain.
- Roll the brownie mixture into 1 tablespoon sized balls and arrange them on a parchment lined baking sheet. Freeze for 30 minutes or until solid.
- Once the truffles are frozen, melt the chocolate wafers in a microwave safe bowl in 20 second increments until smooth.
- Use a fork to dip the frozen truffles in the chocolate to coat them. Gently tap the fork to shake off the excess chocolate before returning to the baking sheet. Immediately top with sprinkles.
- Place the truffles in the refrigerator for 15-20 minutes to allow the chocolate coating to set.
Notes
- Store the brownie truffles in an airtight container in the refrigerator for up to 1 week. As the truffles contain cream cheese they do need to be refrigerated.
- The brownie truffles can be kept in the freezer for up to 2 months. Place the truffles in a single layer on a parchment-lined tray and freeze until solid. Once frozen, transfer them to a sealed container or a zip-top bag. Allow them to thaw in the refrigerator before serving them.
Nutrition
Disclaimer: Nutrition information is estimated based on automated calculations and should be considered as an approximation. These estimates are provided as a courtesy. Please use your own brand’s nutritional values to verify accuracy.
Very good truffle. I had to use a gluten free brownie mix but it worked well. Directions are clear and they are easy to make.
can i used whipped cream cheese instead of block cream cheese?
No, whipped cream cheese will not give a smooth creamy texture. I have updated the recipe to specify block cream cheese.
It’s really creamy I couldn’t get it to shape into balls
I would recommend refrigerating it for 30 minutes or so to help the mixture firm up a bit. That will make it easier to roll into balls.
I wonder if I could add some Kahlua or perhaps espresso powder?
You can definitely add espresso powder. If you want to make Kahlua truffles my Baileys truffles recipe might be a better place to start. I think the brownie truffles might be too soggy with additional liquid added. If you want to try the brownie truffles with Kahlua you could bake the brownies with Kahlua, or reduce the cream cheese to 2-4 ounces and add 1-2 tablespoons of kahlua to the batter and see how it works out.
With the cream cheese do these have to be refrigerated or can they be boxed up and mailed for a gift?
They need to stay refrigerated with the cream cheese. If you want to package them up as a gift you can sub the cream cheese for 1/4-1/2 cup of chocolate frosting.