Bunny Butt Cheese Ball


This post may contain affiliate links. Please read our full disclosure policy.
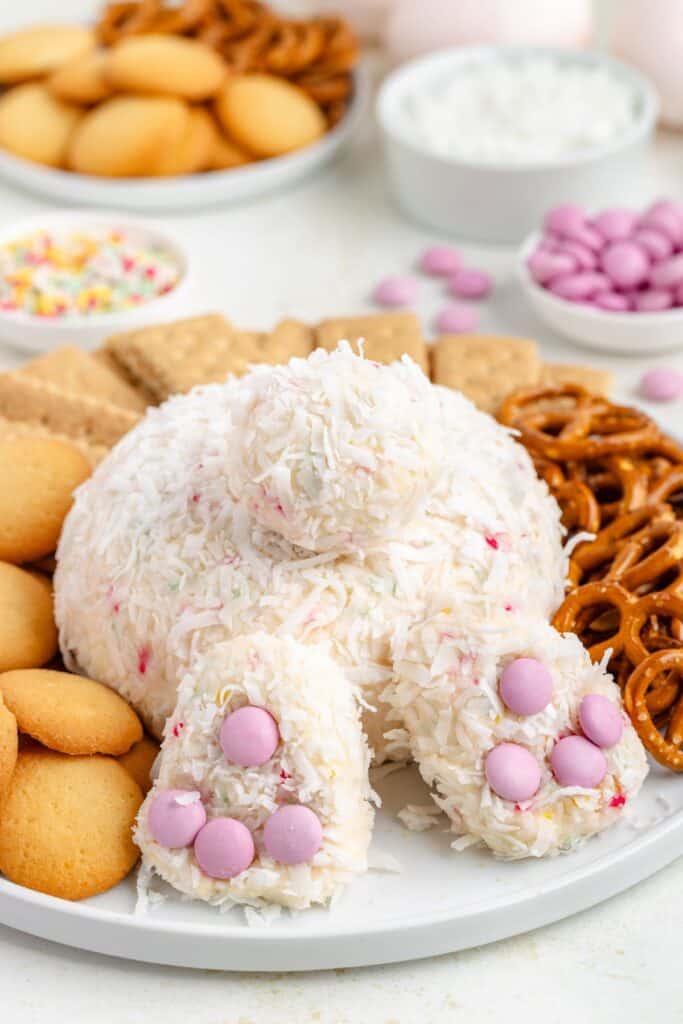
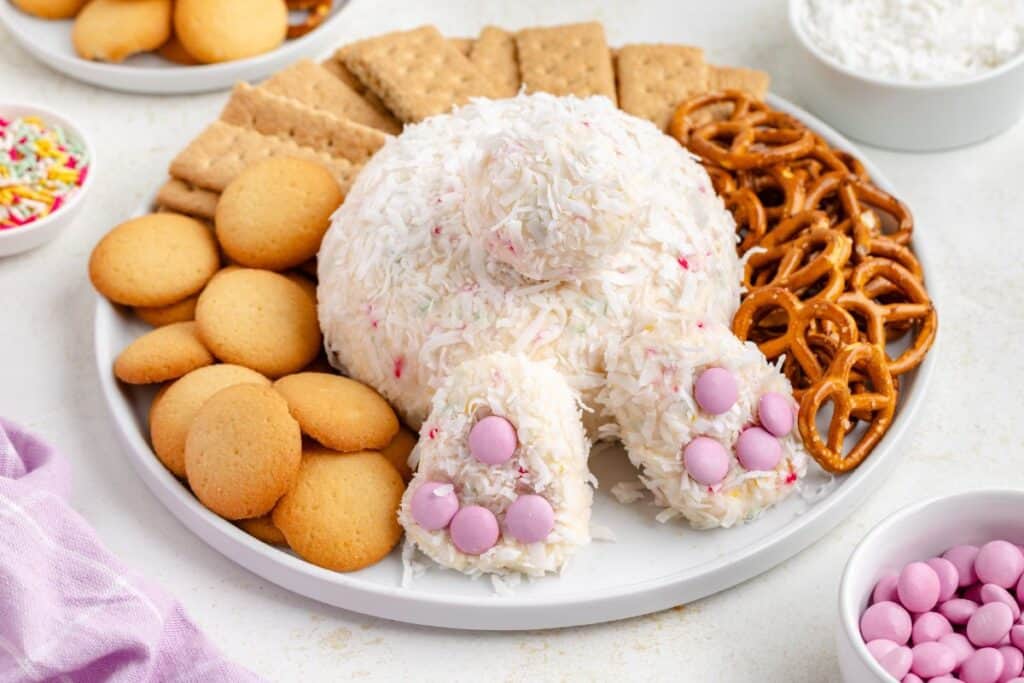
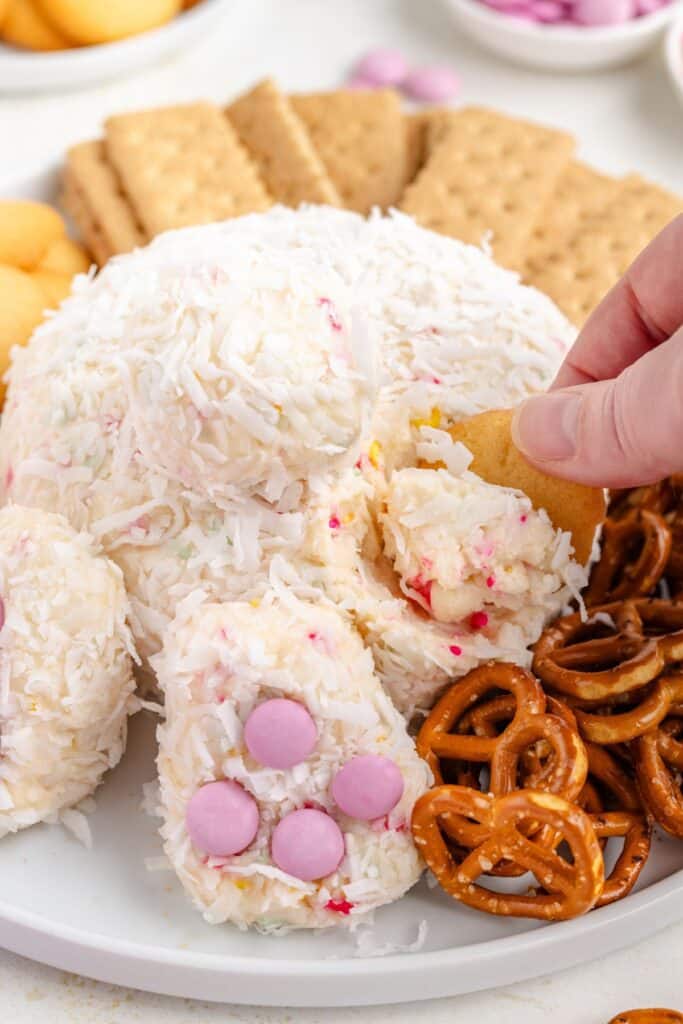
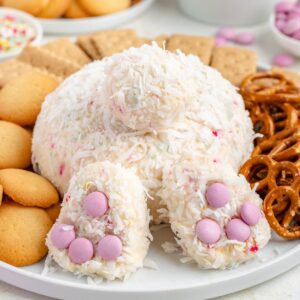
This sweet Easter cheese ball combines cream cheese, butter, and sugar for a soft, creamy base packed with white chocolate chips, coconut, and sprinkles. Shaped into an adorable bunny butt, it’s a fun and festive centerpiece for your spring dessert table.
Easy Bunny Butt Cheese Ball
I love bunny butts and I cannot lie! There’s just something charming about those little fluffy tails —especially in dessert form. This Bunny Butt Cheese Ball hits all the marks for me: it’s cute, creative, and has that nostalgic charm that makes people smile before they even take a bite.
Flavor-wise, it reminds me of a no-bake cheesecake—creamy, sweet, and so easy to pair with graham crackers, strawberries, or even pretzels if you like that sweet-and-salty combo. I rolled it in coconut to give it that fuzzy bunny fur look, and since I’m a huge coconut dessert fan, it adds the perfect texture. But if coconut’s not your thing, white jimmies or nonpareils still keep it fun and festive.
If you love adorable no-bake Easter treats, check out my Chick Cheese Balls and Easter Pudding Cup Desserts.
Ingredients
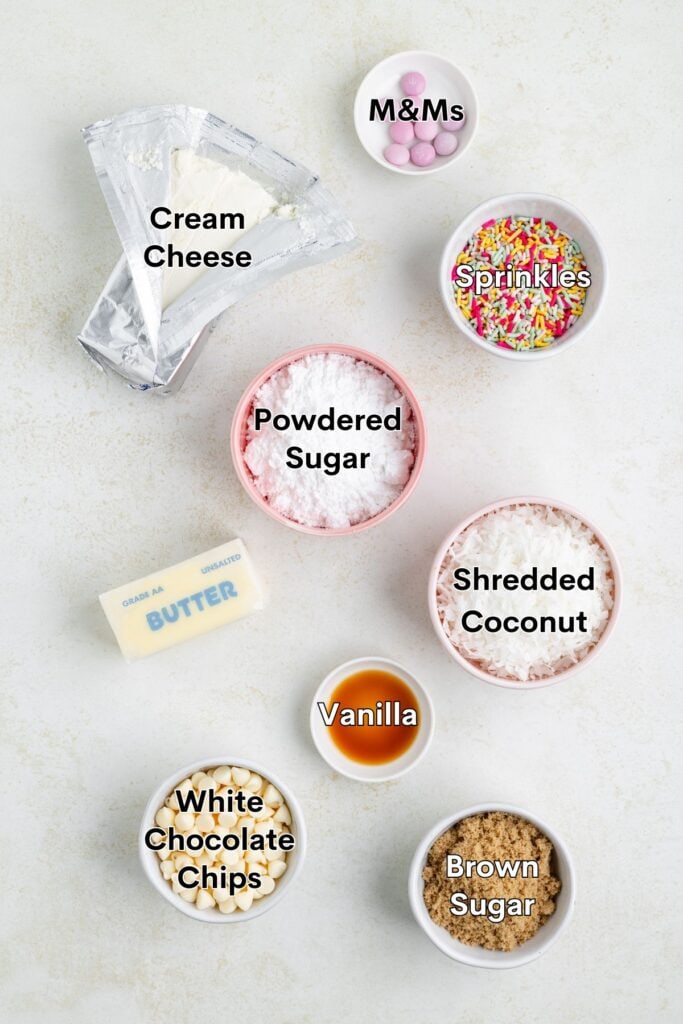
- Cream cheese – The creamy base that gives this dessert its cheesecake flavor.
- Unsalted butter – Helps smooth the mixture and hold its shape.
- Powdered sugar – Adds sweetness.
- Brown sugar – Adds a hint of rich, caramel-like flavor.
- Vanilla extract – Brings warmth and enhances the sweetness.
- White chocolate chips – Add a fun texture and sweetness.
- Sprinkles – Add color and crunch.
- Sweetened shredded coconut – Mimics bunny fur and adds texture.
- Pink M&Ms – Used for the bunny toes.
Making the Dessert Cheese Ball Bunny
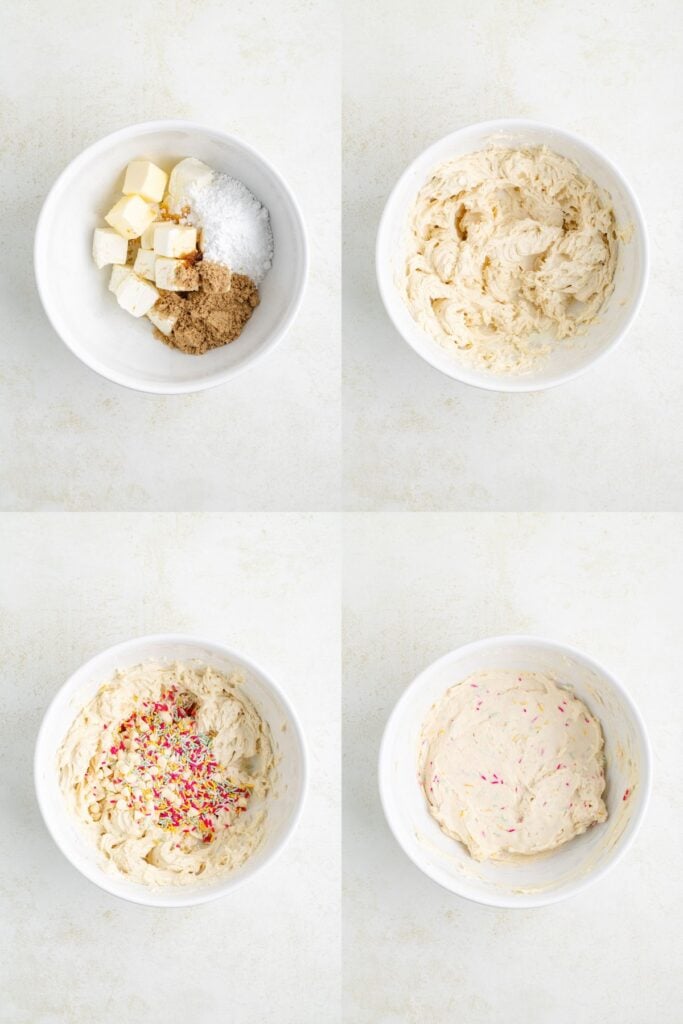
- Mix the base – In a large bowl, combine the softened cream cheese, butter, powdered sugar, brown sugar, and vanilla extract. Mix with a hand mixer until smooth and well combined.
- Stir in the extras – Fold in the white chocolate chips and sprinkles until evenly distributed throughout the mixture.
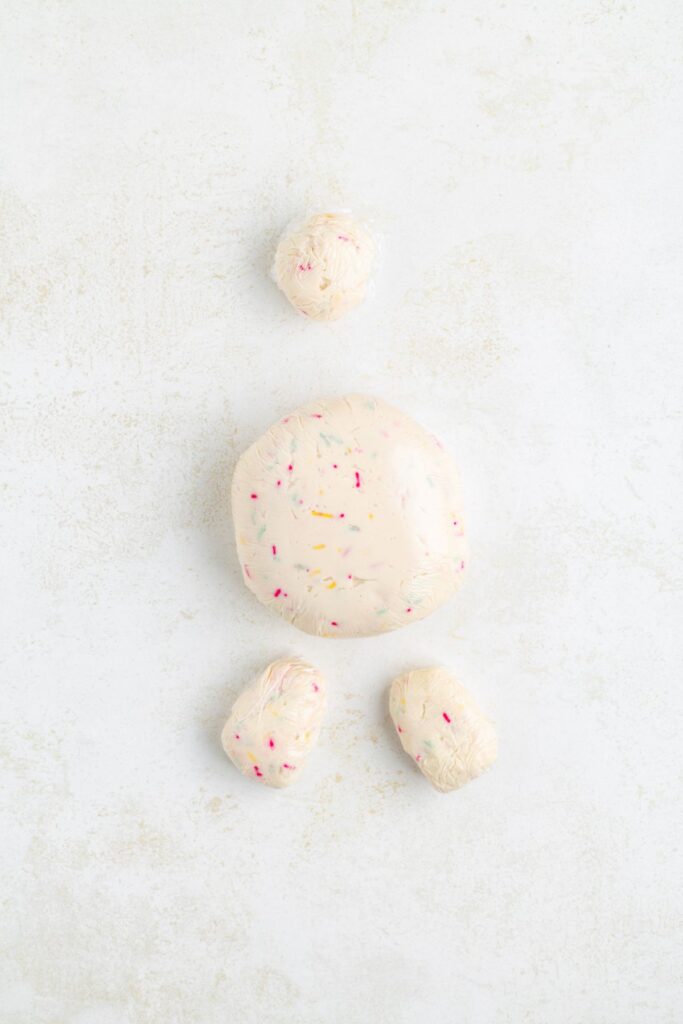
- Shape the bunny parts – Scoop out 2 tablespoons for the tail and 3 tablespoons each for the feet. Use the remaining mixture for the body. Place each portion on its own piece of plastic wrap. Shape the body and tail into round balls, and shape the two foot portions into oval foot shapes. Wrap each piece tightly in plastic and refrigerate for at least 2 hours or overnight until firm.
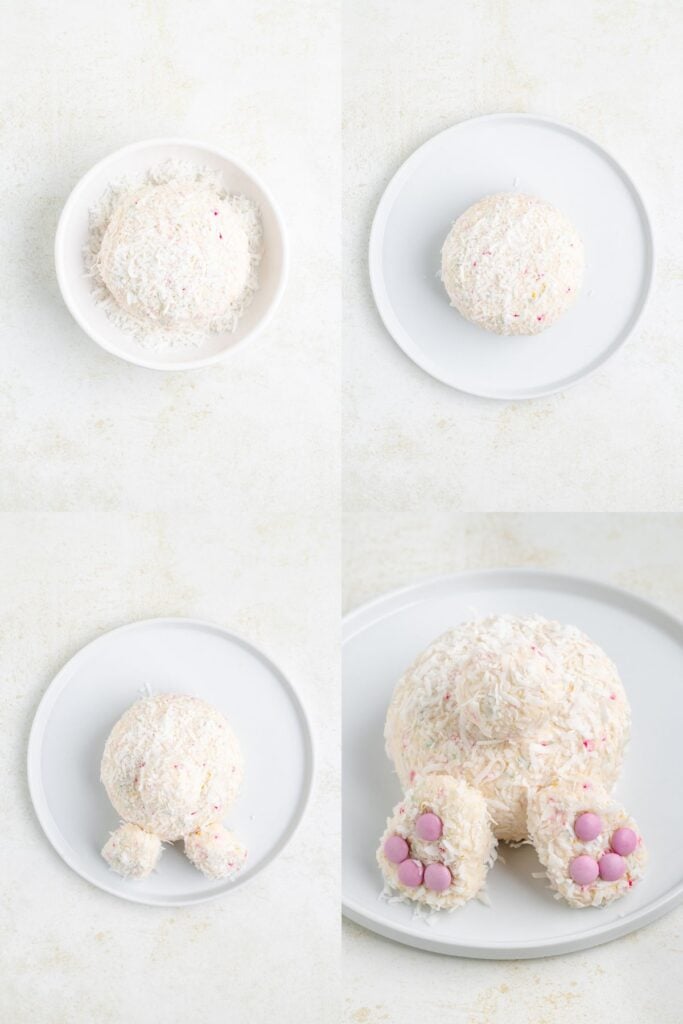
- Coat in coconut – Unwrap each piece and roll in shredded coconut to coat completely.
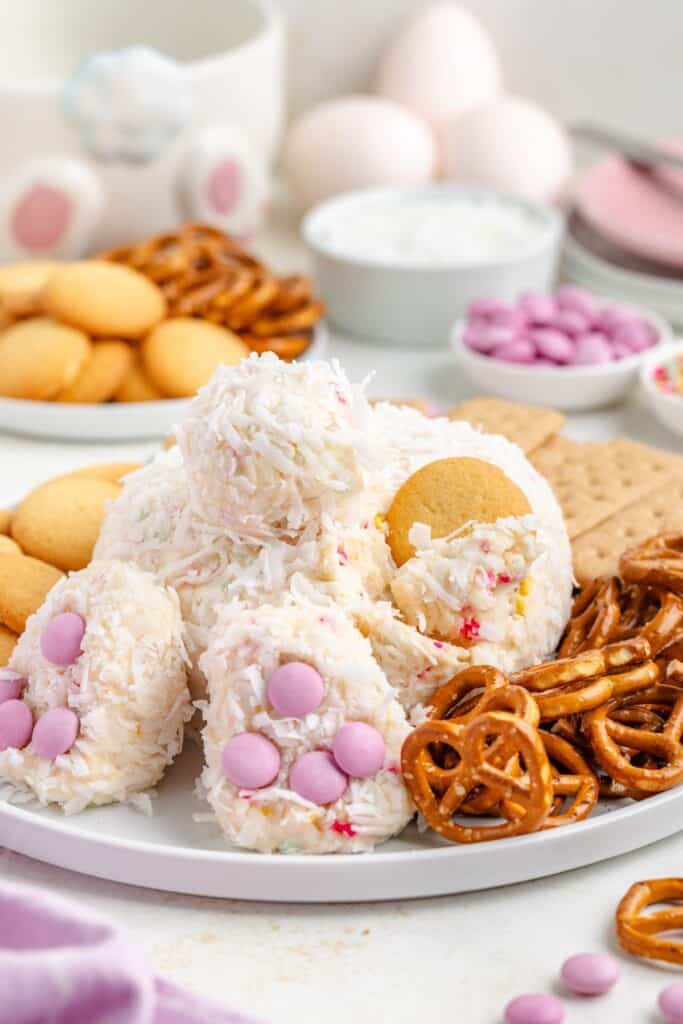
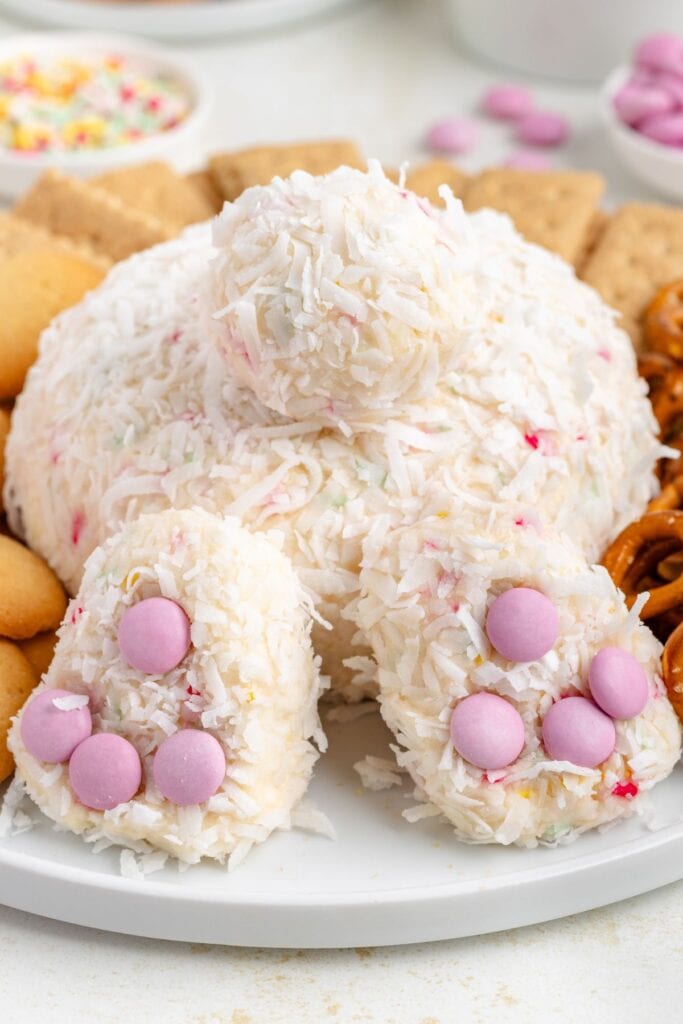
- Assemble and decorate – Place the large ball on a serving plate for the bunny body. Position the feet at the base and attach the small ball for the tail. Press pink M&Ms into each foot to create paw pad details. Serve chilled with graham crackers, fruit, or pretzels.
Variations and Substitutions
- Swap the coconut – If you’re not a fan of coconut, try rolling the cheese ball in white jimmies, nonpareils, or finely crushed vanilla cookies for a similar look with a different texture.
- Change the mix-ins – Instead of white chocolate chips, try mini marshmallows, chopped dried fruit, or pastel-colored candy pieces for a more colorful or chewy texture.
- Flavor boost – Mix in a teaspoon of lemon zest or almond extract for a slight twist.
- Make it nutty – Fold in finely chopped toasted pecans or walnuts for added crunch and richness.
- Different feet – Instead of M&Ms, use another round candy like Sixlets, pink melting wafers, or jelly beans for the bunny toes.
Tips for Success
- Soften ingredients fully – Make sure the cream cheese and butter are fully softened before mixing to avoid lumps and make blending easier.
- Use plastic wrap to shape – It’s much easier to shape and smooth the parts when you work with plastic wrap; plus, it keeps everything neat for chilling.
- Chill thoroughly – Don’t skip the chill time—this step is key for helping the shapes hold up and making the cheese ball easier to coat and decorate.
- Roll gently in coconut – Press the coconut on lightly to avoid squishing the shape, especially on the feet and tail.
- Assemble just before serving – If you’re prepping ahead, keep the bunny parts wrapped separately and assemble them on the serving plate when you’re ready to serve.
Storage
Store the assembled cheese ball in an airtight container or gently covered with plastic wrap in the fridge for up to 5 days. Store the bunny parts separately and assemble just before serving to keep the shape and decorations fresh.
This cheese ball isn’t ideal for freezing, as the texture may change once it’s thawed.
Want to be the first to know when the next fun recipe is published? Sign up for our newsletter updates below.
Looking for more cute Easter recipes?
Check out these adorable desserts!
Did you love this cute Easter cheese ball? Please leave a star rating and share your thoughts in the comments below.
Bunny Cheese Ball Dessert
Ingredients
- 2 (8 ounce) packets brick-style cream cheese softened
- 1/4 cup unsalted butter softened
- 2/3 cup powdered sugar
- 1/4 cup brown sugar
- 1 1/2 teaspoons vanilla extract
- 1 cup white chocolate chips
- 1/2 cup sprinkles
- 1 cup sweetened shredded coconut
- 8 pink M&Ms
Instructions
- In a large bowl, combine cream cheese, butter, powdered sugar, brown sugar, and vanilla extract. Mix with an electric hand mixer until smooth and well combined.
- Fold in the white chocolate chips and sprinkles until evenly distributed.
- Scoop out 2 tablespoons of the mixture for the tail and 3 tablespoons each for the feet. Use the remaining mixture for the body.
- Place each portion on its own piece of plastic wrap. Shape the body and tail into balls and the foot portions into oval foot shapes. Wrap tightly and refrigerate for at least 2 hours or overnight.
- Once chilled, unwrap each piece and roll in shredded coconut to coat completely.
- Place the large ball on a serving plate as the body. Position the feet at the base and the small ball in the center for the tail.
- Press pink M&Ms into each foot to create paw pad details. Serve chilled with graham crackers, fruit, or pretzels.
Notes
- Store the assembled cheese ball in an airtight container or gently covered with plastic wrap in the fridge for up to 5 days.
- This cheese ball isn’t ideal for freezing, as the texture may change once it’s thawed.
Nutrition
Disclaimer: Nutrition information is estimated based on automated calculations and should be considered as an approximation. These estimates are provided as a courtesy. Please use your own brand’s nutritional values to verify accuracy.