Baby Chick Cheese Balls


This post may contain affiliate links. Please read our full disclosure policy.
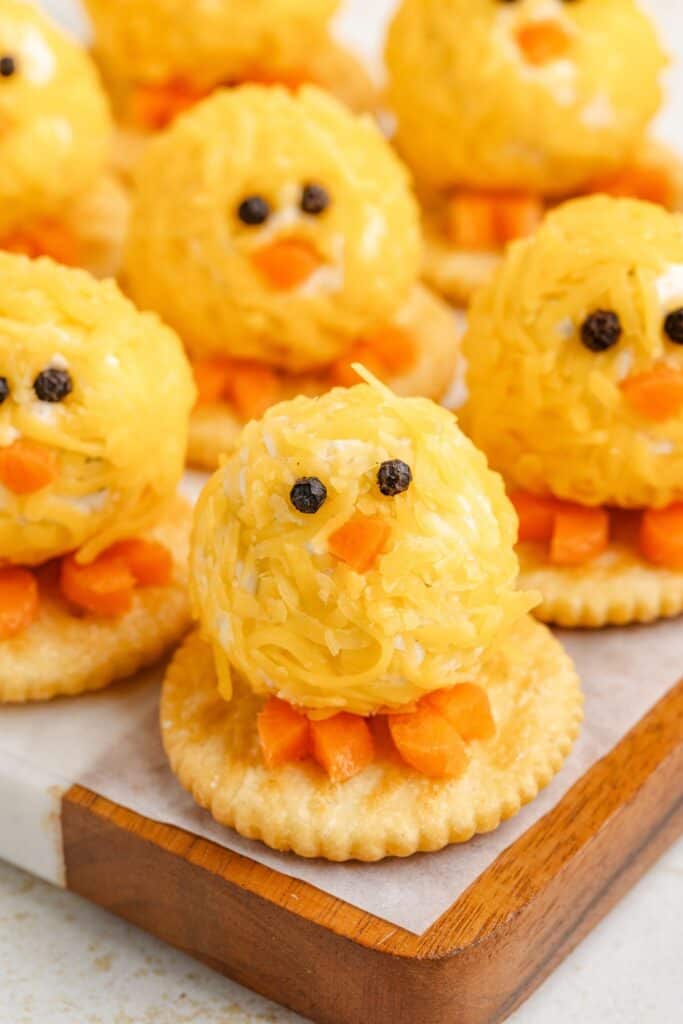
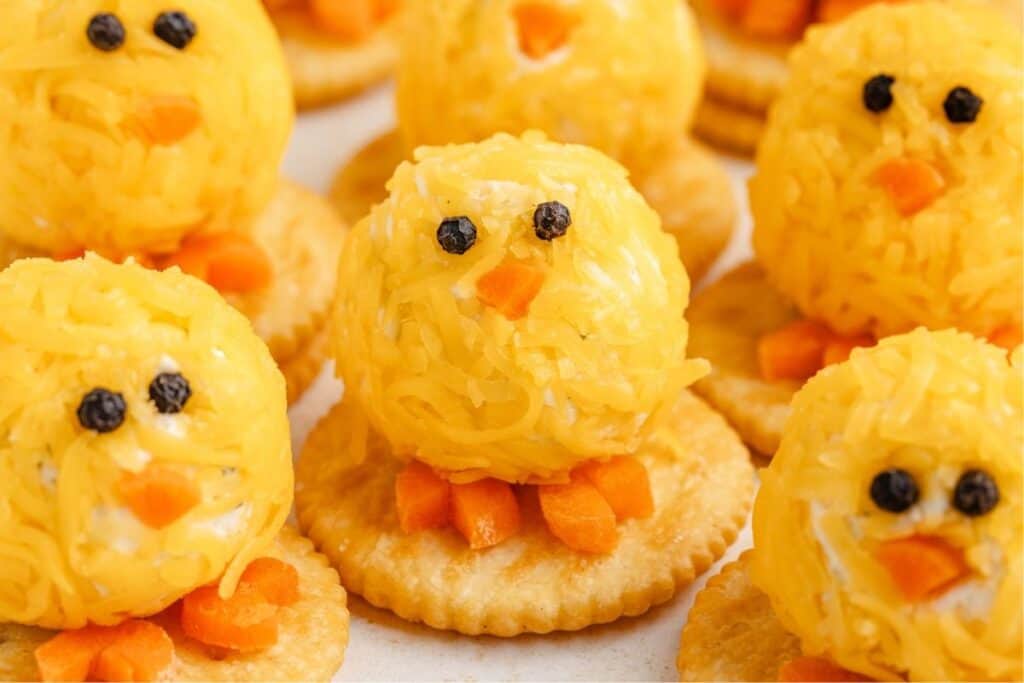
These Baby Chick Cheese Balls are a fun and festive Easter appetizer made with a creamy blend of ranch-seasoned cream cheese and cheddar. Rolled into mini balls and decorated with baby carrots and peppercorns, they come together easily and look adorable on any spring table.
Easy Easter Baby Chick Cheese Balls
I’m a sucker for anything cute, and when it involves cheese? Even better. These baby chick cheese balls check all the boxes for me—adorable, simple, and full of flavor. I went with a basic ranch and cheddar combo to keep things easy, but they’re super customizable if you want to mix things up. Whether you add bacon, green onions, or a little cayenne, the base is flexible enough to work with whatever you like.
We usually do a casual brunch for Easter with lots of graze-friendly dishes, and these mini cheese balls fit right in. They’re fun to make, especially when you start decorating the little chick faces with baby carrots and peppercorns. They always get compliments and giggles, and honestly, they’re one of my favorite parts of the table. Cute and cheesy is a hard combo to beat.
Speaking of cute Easter chick recipes, check out my Nutter Butter Chick Cookies.
Ingredients
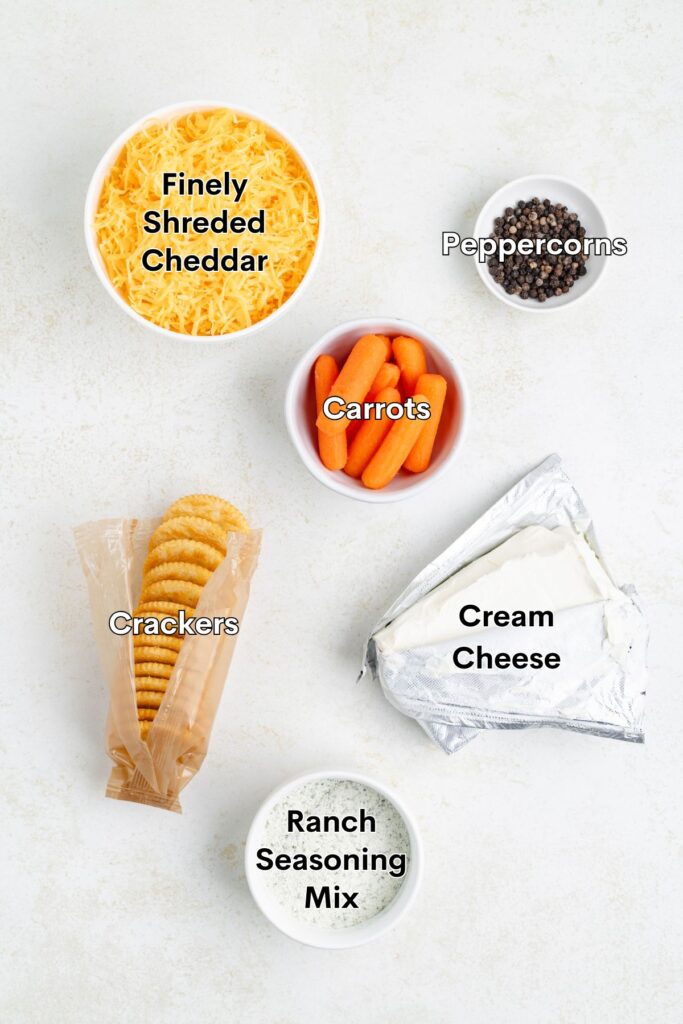
- Cream cheese – Forms the creamy base for the cheese balls.
- Ranch seasoning mix – Adds bold, herby flavor without needing extra spices. Use the dry mix only; do not prepare.
- Cheddar cheese – Brings sharp flavor and creates the chick “feathers.”
- Baby carrots – Used to make the beaks and feet.
- Whole peppercorns – Create the little chick eyes.
- Round crackers – The perfect base for serving, making the chicks easy to grab.
Making the Mini Cheese Balls
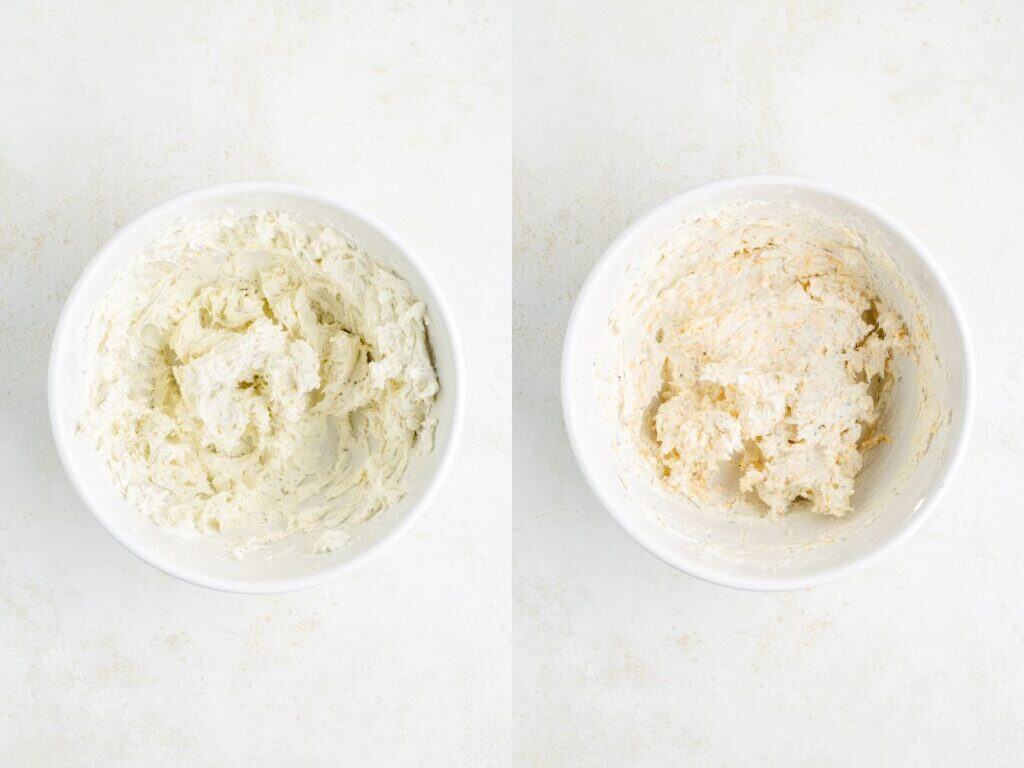
- Mix the base – In a large bowl, combine the cream cheese and ranch seasoning mix. Stir until smooth and fully combined.
- Add the cheese – Fold in 1 ½ cups of the shredded cheddar until evenly mixed.
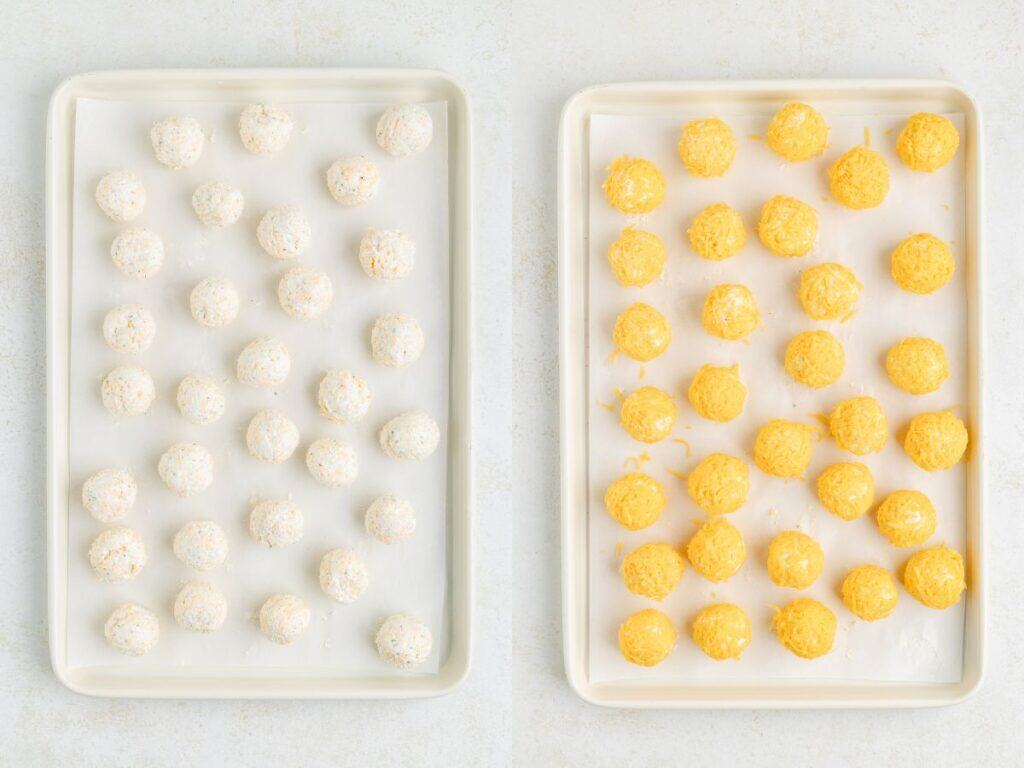
- Shape and coat the cheese balls –Scoop out tablespoon-sized portions and roll into small balls using your hands. Roll each cheese ball in the remaining 1 ½ cups of cheddar to coat. Set aside on a tray or plate.
- Prep the carrots – Slice the baby carrots into 75 thin rounds. Cut a small triangle out of 60 slices to form chick feet. Cut the remaining 15 slices into quarters to create small beaks. (See process shots in the post for reference.)

- Decorate – Roll each cheese ball in the remaining 1 ½ cups of cheddar to coat. Press two peppercorns into each ball for eyes, then add a carrot quarter for the beak.
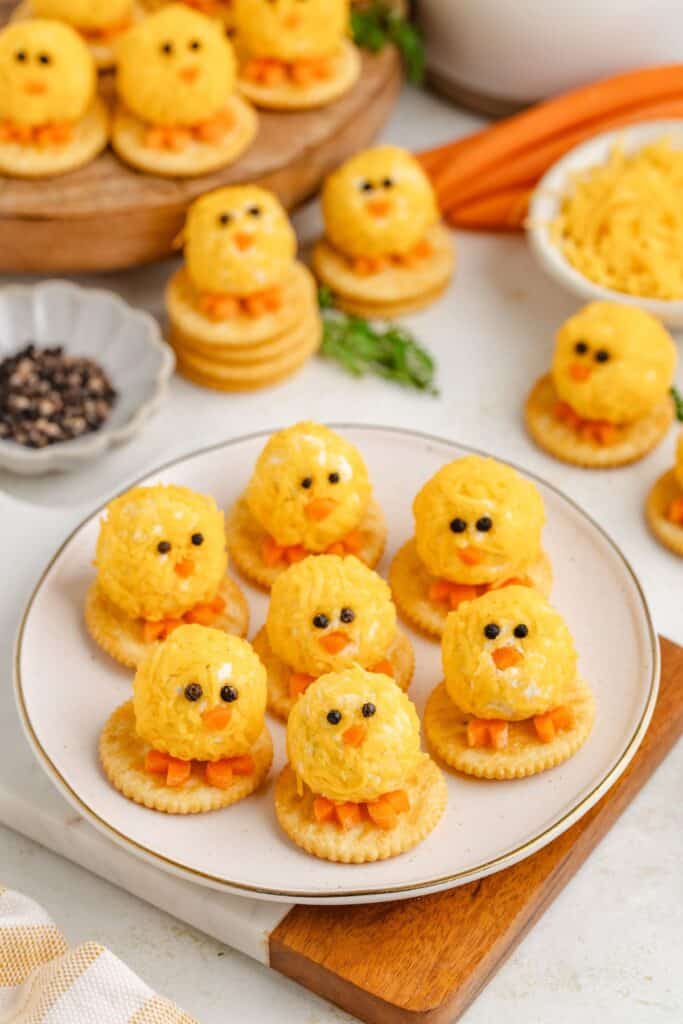
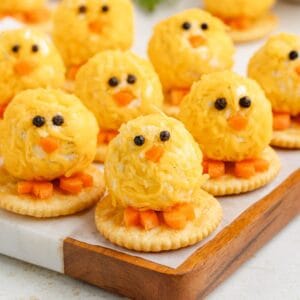
- Assemble the chicks – Place two carrot feet on a round cracker, then gently press a decorated cheese ball on top.
- Chill and serve – Refrigerate until ready to serve. These are best served chilled and eaten within a few hours.

Variations and Substitutions
- Add-ins for flavor – Mix in finely chopped cooked bacon, green onions, or fresh chives for extra flavor and texture.
- Switch up the seasoning – Swap ranch seasoning for garlic and herb seasoning, taco seasoning, or everything bagel seasoning for a fun twist.
- Make it spicy – Stir in a pinch of cayenne pepper or a few dashes of hot sauce if you want a little heat.
- Cheese options – Try sharp white cheddar, Monterey Jack, or a cheddar-pepper jack blend for something different.
- Alternative decorations – Use black sesame seeds or mini chocolate chips for eyes if you don’t have peppercorns. Thin pretzel sticks can be used instead of carrot feet for a crunchy twist.
Tips for Success
- Soften the cream cheese – Room temperature cream cheese is much easier to mix and gives a smoother texture.
- Use finely shredded cheese – Smaller cheese shreds stick more easily to the outside of the cheese balls and help mimic the chick’s fluffy look. I used the smallest hole on my cheese grater, but pre-shredded cheese labeled “fine shred” also works.
- Work with clean hands – Rolling the cheese balls can get sticky—wash your hands halfway through or lightly coat them with oil or cooking spray to make shaping easier.
- Chill briefly before decorating – If the cheese balls are too soft after shaping, a quick 10-minute chill helps them firm up before adding the eyes and beaks.

Storage
ParagrapYou can shape and coat the cheese balls up to 2 days in advance. Store them in an air tight container in the refrigerator. Decorate and assemble the chicks on the day you plan to serve.
Do not freeze the cheeseballs.

Want to be the first to know when the next easy appetizer is published? Sign up for our newsletter updates below.
Looking for more easy appetizers?
Check out these easy recipes.
Did you love these cute chick cheese balls? Please leave a star rating and share your thoughts in the comments below.
Mini Chick Cheese Balls
Ingredients
- 2 (8-ounce) packets brick-style cream cheese room temperature
- 1 (1-ounce) packet ranch seasoning mix about 3 tablespoons
- 3 cups finely shredded cheddar cheese divided
- 6-10 baby carrots
- 60 whole peppercorns
- 30 round crackers such as Ritz
Instructions
- In a large bowl, combine the cream cheese and ranch seasoning mix. Stir until smooth and fully combined.
- Fold in 1 ½ cups of the shredded cheddar until evenly mixed.
- Scoop out tablespoon-sized portions and roll into small balls using your hands.
- Roll each cheese ball in the remaining 1 ½ cups of cheddar to coat. Set aside on a tray or plate.
- Slice the baby carrots into 75 thin rounds. Cut a small triangle out of 60 of the slices to form chick feet. Cut the remaining 15 slices into quarters to create small beaks.
- Press two peppercorns into each cheese ball for eyes, then add a carrot quarter for the beak.
- Place two carrot feet on a round cracker, then gently press a decorated cheese ball on top.
- Refrigerate until ready to serve.
Notes
- You can shape and coat the cheese balls up to 2 days in advance. Store them in an air tight container in the refrigerator. Decorate and assemble the chicks on the day you plan to serve.
- Do not freeze the cheeseballs.
Nutrition
Disclaimer: Nutrition information is estimated based on automated calculations and should be considered as an approximation. These estimates are provided as a courtesy. Please use your own brand’s nutritional values to verify accuracy.