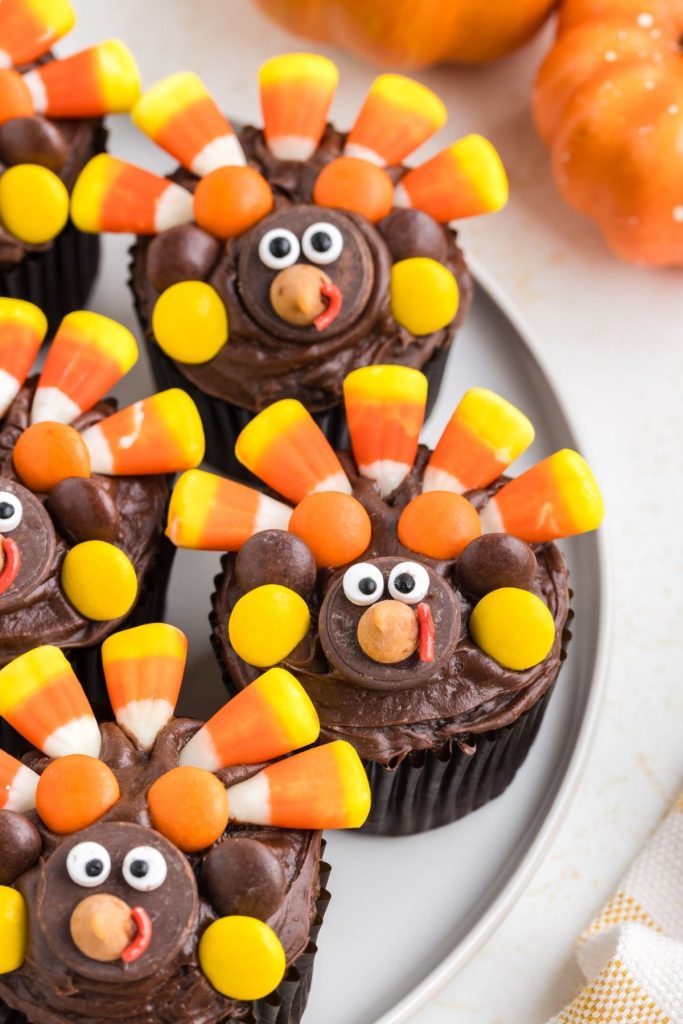
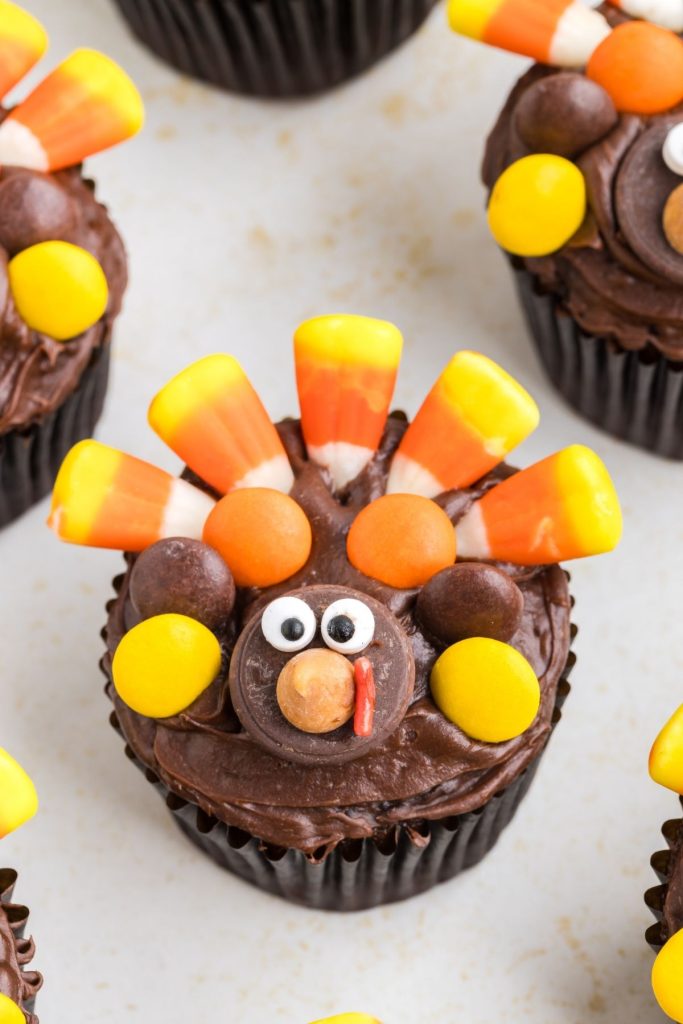
Turkey Cupcakes

These turkey cupcakes are a fun, easy way to get creative with dessert. Starting with a cake mix base and finishing with a few simple candy decorations, they’re the perfect choice for adding something playful to the table. They’re easy to make and guaranteed to be a hit with everyone.
These turkey cupcakes are not only a feast for the palate but also a fantastic way to engage the little chefs in your life. Gather your kids and let them unleash their creativity as they transform plain cupcakes into edible works of art. It’s a fantastic activity that’ll keep them entertained and excited, making it a memorable addition to your Thanksgiving dessert spread that everyone will be thankful for. So, roll up those sleeves, spread out the candies, and let the family fun and culinary artistry begin!
Ingredients for Turkey Cupcakes
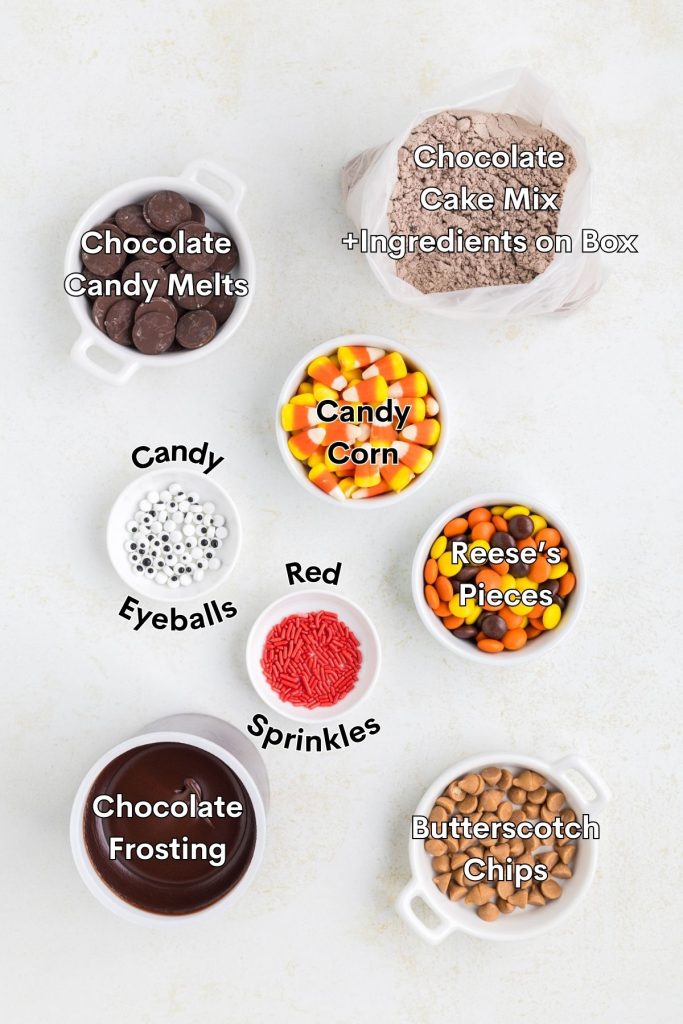
- Box of chocolate cake mix (plus ingredients listed on the package)– Provides a rich and moist chocolatey base for our cupcakes. Use your favorite flavor.
- Tub of chocolate frosting – Adds a decadent layer of sweetness and holds our cupcake decorations.
- Chocolate melting wafers – Used for the turkey’s face, offering a playful crunch.
- Butterscotch chips – Attached to the chocolate melting wafer to create the turkey’s beak.
- Red sprinkles – Creates the turkey’s wattle, adding a fun pop of color.
- Mini candy eyeballs – These cute candy eyeballs bring our turkey cupcakes to life, giving them a playful and endearing appearance.
- Candy corn – Used for the tail feathers, contributing a sweet and chewy element.
- Reese’s pieces – Create the turkey’s wings, offering a burst of peanut butter flavor and a satisfying crunch.
Making the Turkey Cupcakes
- Bake cupcakes – Prepare the cupcakes according to the package directions and allow them to cool to room temperature.
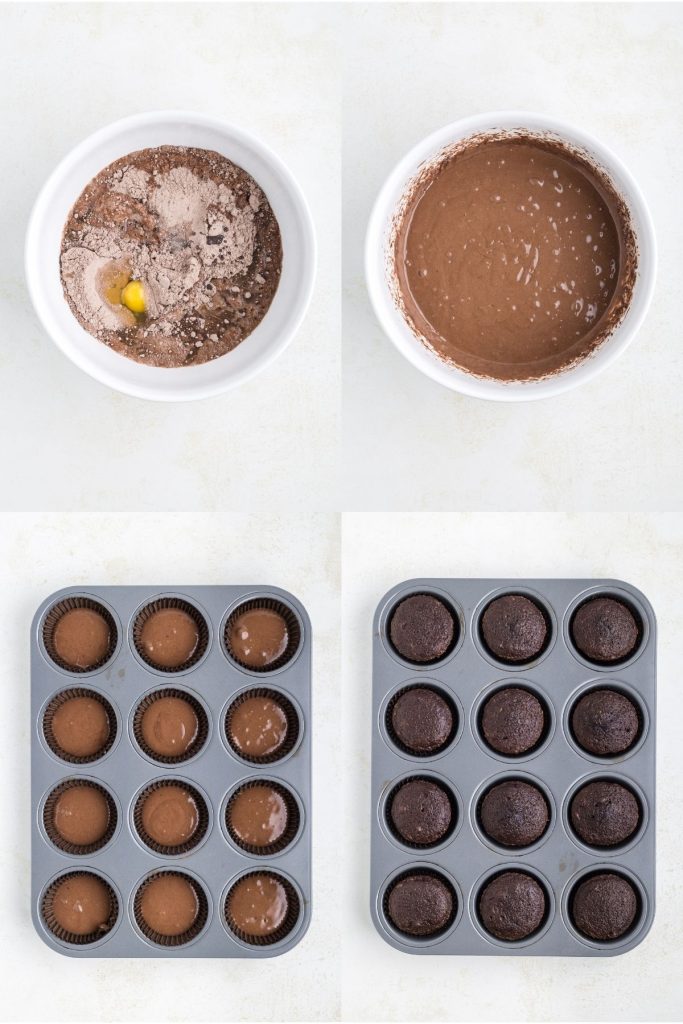
- Frost cupcakes – Once your cupcakes are ready, take a generous scoop of the chocolate frosting and spread it evenly over the top of each cupcake. This layer of frosting provides a tasty base for our turkey decorations.
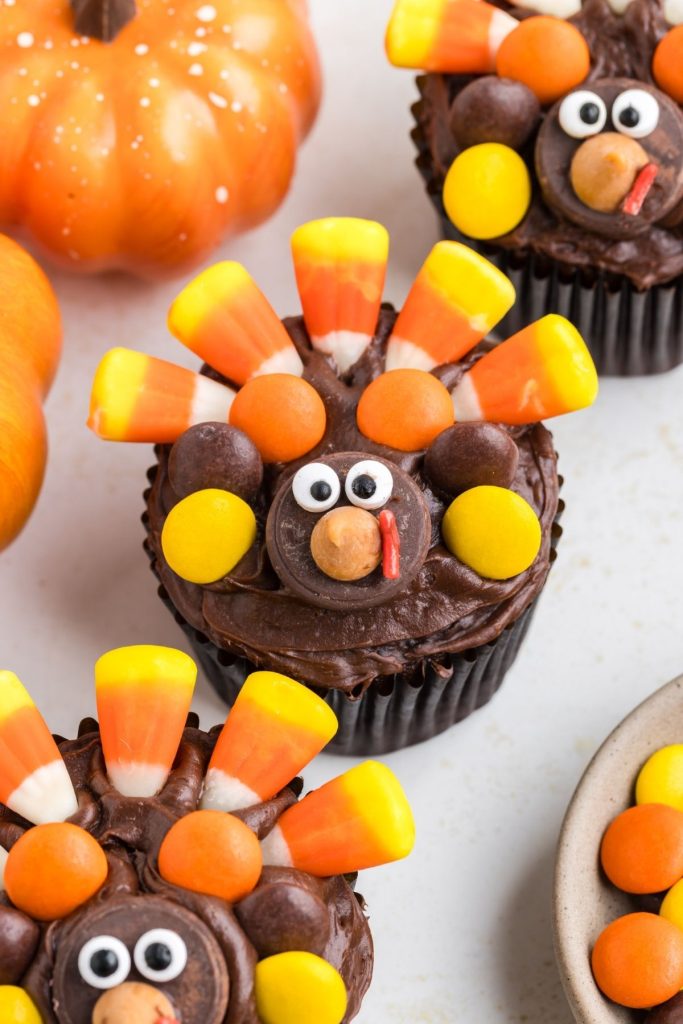
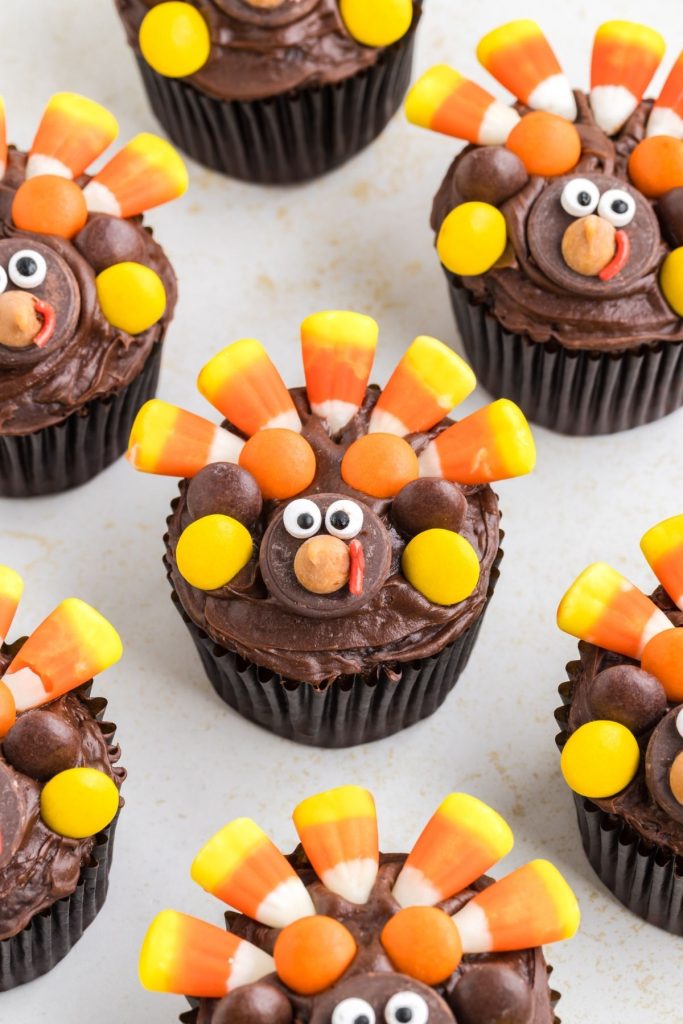
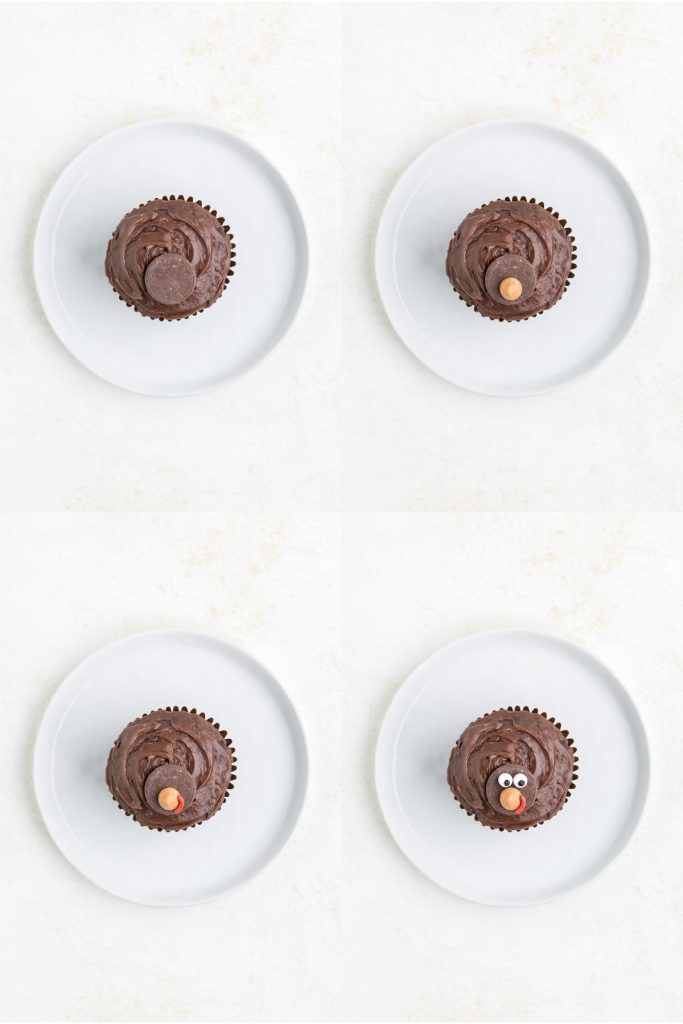
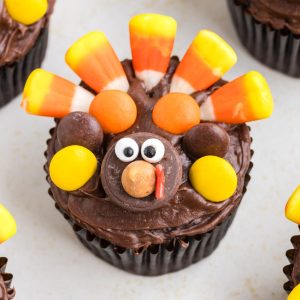
- Create the head – To create the turkey’s head, attach a chocolate melting wafer to the lower center of the cupcake, with the rounded side down. This will be the base for the adorable face.
- Add the beak – Using a toothpick, dab a small amount of frosting on the flat side of a butterscotch chip and then attach it to the lower center of the melting wafer to form the beak.
- Make the wattle – For the turkey’s wattle, smear a bit of frosting on one side of a red sprinkle and attach it to the butterscotch chip. This tiny detail adds a pop of color and personality.
- Add the eyes – Now, give your turkey some expressive eyes! Apply a dab of frosting to two candy eyeballs and attach them above the beak on the melting wafer. This will bring your turkey cupcakes to life.
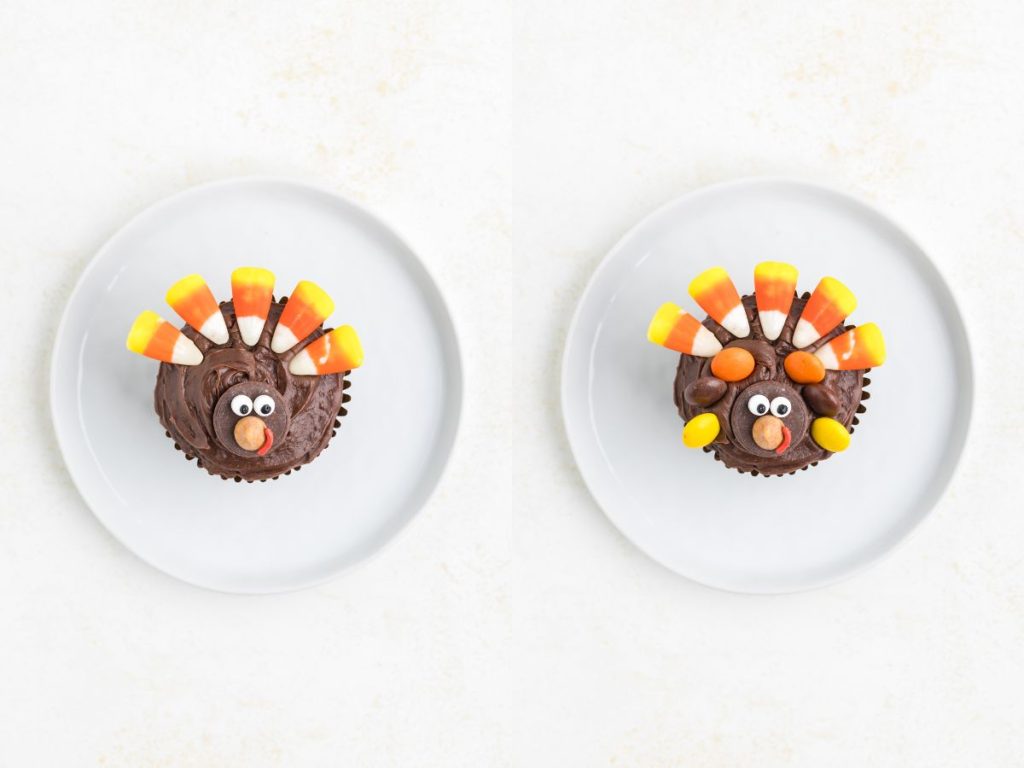
- Design the tail – To create the turkey’s tail, stick five candy corn pieces in a fan shape on the top half of the cupcake.
- Craft the wings – For the final touch, attach three Reese’s Pieces on either side of the melting wafer to create the turkey’s wings. Mix and match colors to make the wings vibrant and eye-catching.
- Allow to set – After you’ve completed all the decorations, allow the frosting to set for about 15-20 minutes. This will ensure that your turkey cupcakes are sturdy and ready to be enjoyed.
Variations and substitutions
Homemade cupcakes – Instead of a cake mix, you can prepare cupcakes from scratch using your favorite recipe.
Flavor variations – You can use different cake mix flavors to add variety. Try vanilla, red velvet, or even pumpkin spice cake mix for a true fall twist.
Frosting choices – While chocolate frosting complements the turkey design well, you can experiment with other frosting flavors like cream cheese, caramel, or peanut butter for a unique twist.
Head variation – Instead of using a chocolate melting wafer for the turkey’s head, consider using a Reese’s Miniature Cup. This alternative will introduce a rich peanut butter flavor and a unique texture to the head of your turkey cupcakes. It’s a delicious variation that adds a delightful twist to the recipe.
Beak variations – Instead of butterscotch chips for the turkey’s beak, you can get creative with different chip options. Try using peanut butter chips for a nutty twist, chocolate chips for a classic cocoa flavor, or even cinnamon chips to infuse a warm, spiced note into your turkey cupcakes.
Mini pretzels – Substitute mini pretzels for candy corn or add them in addition to the candy corn to create a different texture for the turkey’s tail.
Wing variation – Instead of Reese’s Pieces for the turkey’s wings, you can experiment with using colorful M&Ms.
Tips for success
- Prepare decorations in advance – Before starting, have all your decorations ready and organized. This makes the decorating process smoother and more enjoyable.
- Cool cupcakes completely – Ensure that your cupcakes are completely cooled before frosting and decorating. Warm cupcakes can cause the frosting to melt.
- Consistent frosting – When spreading the frosting, aim for a consistent and smooth layer. This will provide a stable surface for attaching the decorations. I like to use a mini offset spatula to achieve a uniform frosting layer. If you find your tub of frosting is too thick, you can place it in the microwave for 10-15 seconds to soften it, but remember to remove the foil lid completely before microwaving. This will make the frosting easier to work with and ensure even application.
- Toothpick precision – Use a toothpick to apply small amounts of frosting for attaching small candies like the beak and wattle. It offers better control for intricate details.
- Firm attachments – Ensure that your candy decorations are firmly attached to the frosting to prevent them from falling off.
- Involve kids – These cupcakes are perfect for getting the little ones involved! Encourage their creativity and let them take part in the decoration process.
Storage
Store leftovers in an airtight at room temperature for up to three days. Avoid stacking the cupcakes so the decorations do not get destroyed.
The decorated cupcakes should not be frozen as the candy eyeballs will bleed and the candy corn tail will become sticky. Unfrosted cupcakes can be frozen in an airtight container for up to three months. Allow the cupcakes to thaw at room temperature before decorating.
Turkey Cupcakes FAQs
You can certainly decorate these cupcakes a few hours before you plan to serve them. However, it’s essential to consider the specific decorations used and their interactions with the frosting.
While it’s perfectly fine to decorate with most candy elements in advance, there’s one aspect to be mindful of. The candy corn used for the turkey’s tail may begin to “weep” after 12-24 hours when in contact with the frosting. This means that the vibrant colors of the candy corn can become sticky and slightly bleed into the frosting, affecting its appearance.
In general, decorating the cupcakes a few hours before your event is an excellent strategy to save time while ensuring they still look and taste their best. Allow the frosting and decorations to set for 15-20 minutes, which will make them more stable and ready to delight your guests when the time comes.
Yes, using regular-sized candy eyes is perfectly acceptable if you can’t find mini ones. However, keep in mind that the mini eyes offer a cuter and more proportionate appearance on the turkey cupcakes, adding to their overall charm. You can easily find mini candy eyes in the cake decorating section at stores like Michaels or Hobby Lobby, or you can order them from Amazon.
Looking for more fall desserts?
Check out these recipes.
Turkey Cupcakes
Ingredients
- 1 (15.25 ounce) box of chocolate cake mix plus ingredients listed on the box
- 1 (16 ounce) tub of chocolate frosting
- 24 round chocolate melting wafers
- 24 butterscotch chips
- 24 red sprinkles
- 48 mini candy eyeballs
- 120 pieces candy corn
- 144 Reese’s Pieces candies
Instructions
- Prepare the cupcakes according to the package directions. Allow the cupcakes to cool to room temperature.
- Spread a layer of the chocolate frosting over the top of the cupcakes.
- Attach a chocolate melting wafer to the lower center of the cupcake, rounded side down. This will create the head for the turkey.
- Use a toothpick to smear a small amount of frosting on the flat side of the butterscotch chip. Attach the chip to the lower center of the melting wafter to create the beak.
- Use a toothpick to smear a small amount of frosting on one side of the red sprinkle and attach it to the butterscotch chip to create the wattle.
- Smear a small amount of frosting to two candy eyeballs and attach them to the melting wafer above the beak.
- Stick five pieces of candy corn to the top half of the cupcake in a fan shape to create the tail.
- Finally, attach three Reese’s Piece on either side of the melting wafer to create the turkey’s wings. I like to use one of each color for the wings.
- Allow the frosting to set for 15-20 minutes before enjoying.
Notes
- Store leftovers in an airtight at room temperature for up to three days. Avoid stacking the cupcakes so the decorations do not get destroyed.
- The decorated cupcakes should not be frozen as the candy eyeballs will bleed and candy corn tail will become sticky. Unfrosted cupcakes can be store in an airtight container for up to three months. Allow the cupcakes to thaw at room temperature before decorating.
Nutrition
Disclaimer: Nutrition information is estimated based on automated calculations and should be considered as an approximation. These estimates are provided as a courtesy. Please use your own brand’s nutritional values to verify accuracy.