Pot of Gold Cookies
These Pot of Gold Cookies bring together easy cake mix cookies, a layer of homemade buttercream, and a dash of playfulness with miniature pots of gold and rainbow belts. Simple, delightful, and perfect for adding a touch of whimsy to your festive St. Patrick’s Day party.

It’s no secret that cake mix cookies are some of my favorite cookie recipes, especially when they’re frosted. The simplicity of the cake mix makes it a go-to for creating easy and versatile cookies. These ‘Pot of Gold Cookies’ take it up a notch, turning classic cake mix cookies into a whimsical St. Patrick’s Day delight. They are a fun idea for getting kids involved in baking cookies. They love transforming Reese’s cups into gold pots and adding them to the end of a rainbow. These fun cookies are sure to become a family favorite.

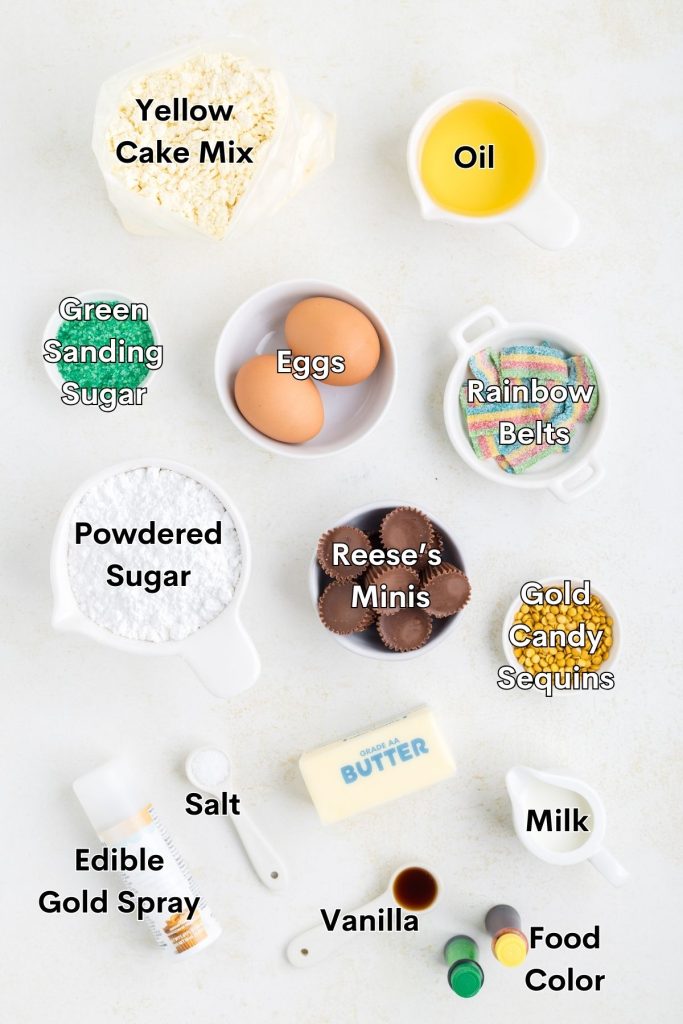
Ingredients for the Pot of Gold Cookies
Cookies
- Yellow cake mix – Provides a convenient base for quick cookies, ensuring a soft and flavorful outcome.
- Vegetable oil – Adds moisture for a chewy and tender texture.
- Eggs – Bind ingredients, contributing to the cookies’ structure.
Frosting
- Unsalted butter – Creates a rich and creamy base for the frosting.
- Vanilla extract – Imparts a subtle, sweet essence, enhancing overall flavor.
- Salt – Balances the sweetness.
- Powdered sugar – Sweetens and thickens the frosting to a smooth consistency.
- Milk or heavy cream – Adjusts the frosting thickness.
- Green food color – Gives the base frosting it’s fun St. Patrick’s Day green.
- Yellow or gold food color – To adhere the gold to the top of the pot.
Decorations
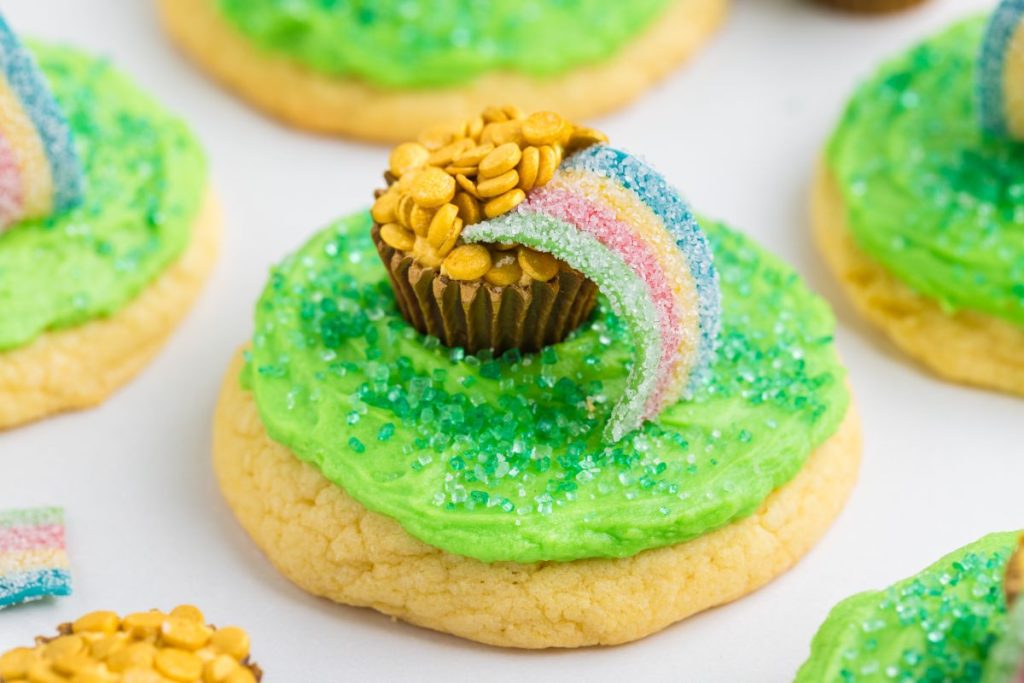
- Reese’s miniature cups – Acts as the base of the adorable pots of gold at the end of the rainbow.
- Edible gold spray or luster dust (optional) – Adds a shimmering, golden finish to enhance the pot of gold look.
- Gold candy sequins or round gold sprinkles – The gold coins for the pots. These can be found in the baking aisle at most craft stores.
- Green sanding sugar (optional) – Adds sparkle and a crunchy texture to the cookie.
- Rainbow sour belts – This playful rainbow candy brings color and fun.
Making the Pot o’ Gold Cookies
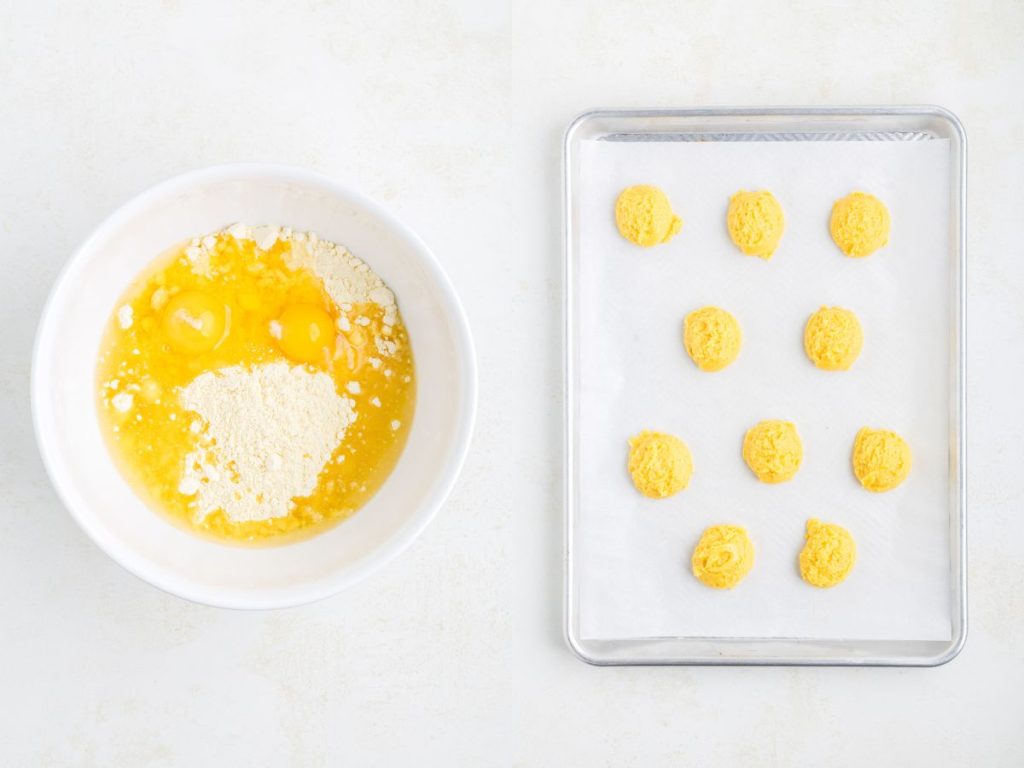
Cookies
- Preparation – Preheat the oven to 350 degrees F and line two large baking sheets with parchment paper.
- Mix dough – Mix the cake mix, oil, and eggs in a large bowl until thoroughly combined.
- Scoop and drop – Use a medium cookie scoop to drop scoops of dough onto the prepared baking sheets, maintaining a two-inch gap between each cookie.
- Bake to perfection – Bake for 10-12 minutes or until the edges are golden brown.
- Cool – Allow the cookies to cool on the cookie sheet for 5 minutes before transferring them to a wire rack to complete the cooling process.
Frosting
- Cream butter – Beat the butter in a large bowl with a hand or stand mixer until smooth and creamy.
- Add flavors – Add the vanilla, salt, and 1 cup of powdered sugar to the butter. Beat until well combined. Gradually add the remaining powdered sugar, 1 cup at a time, and beat well after each addition.
- Adjust consistency – Gradually add milk, ½ tablespoon at a time, until reaching the desired texture.
- Remove mall portion – Remove ¼ cup of the frosting and transfer it to a small bowl.
- Color frosting – Add a few drops of green food color to the remaining frosting in the large bowl and beat until well combined.

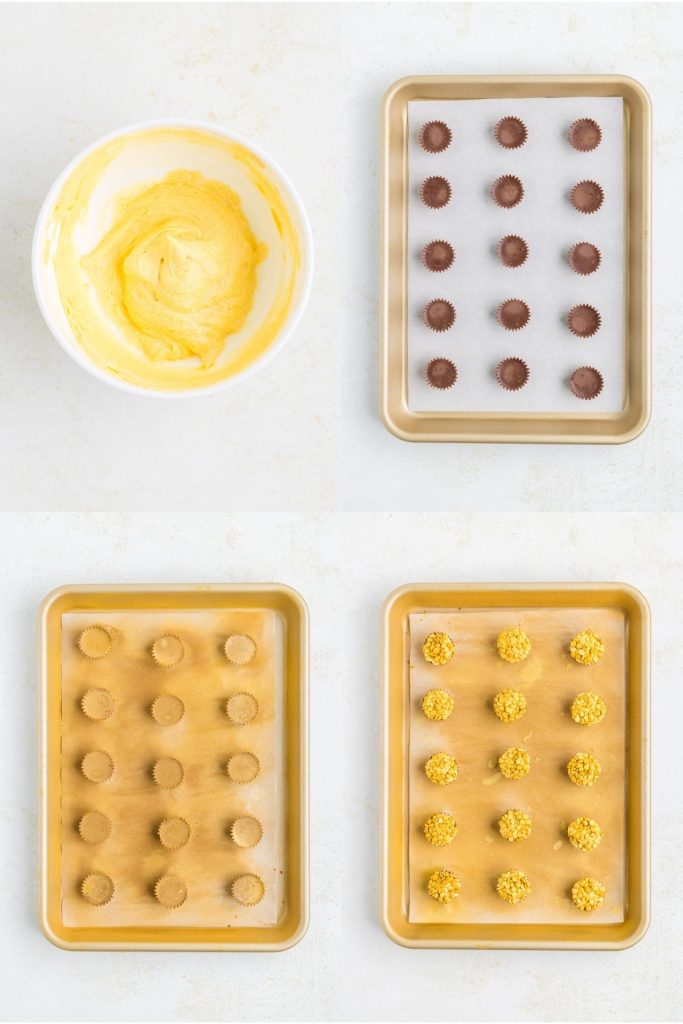
Decorating
- Create gold base – Add a drop or two of gold food coloring to the 1/4 cup of frosting, set aside, and mix thoroughly.
- Arrange pots – Organize mini Reeses peanut butter cups on a parchment-lined baking sheet with ample space between each cup.
- Golden touch – Spray the top and sides of Reese’s cups with gold spray and set aside to dry before moving on to the next step. (I usually complete this step while the cookies are baking.)
- Add gold – Once dry, spread a small amount of gold frosting over the top of Reese’s cups and dip them in gold candy confetti.
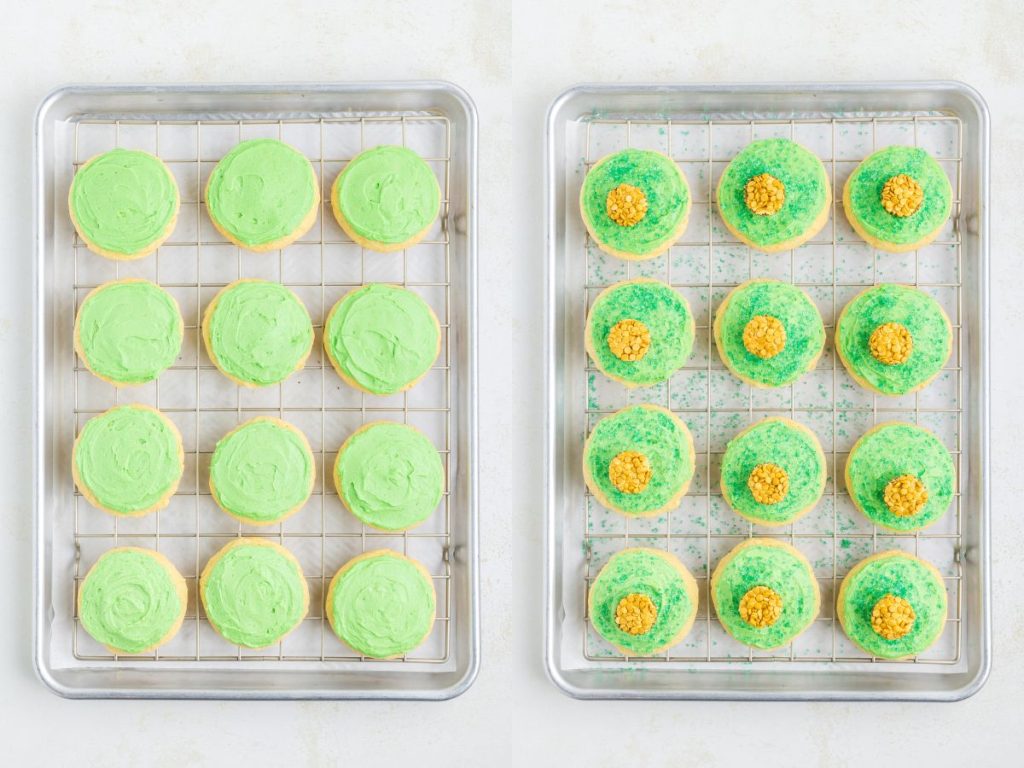
- Frost and sprinkle – Frost each cookie with a layer of green frosting and sprinkle sanding sugar on top.
- Pot placement – Place a pot of gold in the center of each cookie.
- Add rainbow – Gently press the short side of the candy rainbow into the pot of gold, forming an arch over the side of the pot and onto the frosted cookie to create the rainbow shape.
- Set and enjoy – Allow the frosting to set before serving and enjoying your delightful creations.
Variations and substitutions
Cookie base flavor – Use your favorite flavor of cake mix for the cookie base. Vanilla, white, or chocolate cake mixes are all excellent options.
Pot of gold alternatives – Rolo candies turned upside down can serve as an alternative to miniature Reese’s cups for creating the pot for the gold. This is a great option if you are making these cookies for someone with a nut allergy.
Decorative touches – The gold spray and sanding sugar are optional but add a fun effect to the cookies. Sanding sugar creates a grass-like texture and conceals imperfections in the frosting. Alternately, use green jimmies or sweetened shredded coconut dyed with green food color for a different visual appeal.
Time-saving option – Consider using store-bought frosting for quicker preparation. A tub of white or vanilla frosting can replace homemade frosting, saving you time and effort.

Tips for success
- Pot of gold placement – If using gold spray to color the pots of gold, leave at least 1 inch between each Reese’s cup on the tray. This allows sufficient space to spray the entire cup for a uniform golden effect.
- Uniform cookie size – Utilize a cookie scoop when scooping the dough. This ensures consistent cookie size and shape, promoting even baking.
- Complete cooling – Ensure the cookies have cooled entirely before frosting. Applying frosting to warm cookies can cause it to melt and run off. Patience in cooling leads to a well-set frosting.
- Soft butter – Soften butter to room temperature before making the frosting. If the butter is too hard, it won’t mix well with the sugar, resulting in a grainy texture. Softened butter is crucial for achieving a creamy buttercream.

How to store the cookies
Store leftovers in an airtight container at room temperature for up to five days.
The cookies can be frozen for up to three months. The cookies should be stored in a single layer so the decorations do not get ruined. Thaw the cookies at room temperature before enjoying them.
Want to be the first to know when the next easy recipe is released? Sign up for our newsletter updates below.
Looking for more Easy Cookies?
Check out these cake mix cookie recipes.
- Triple Chocolate Cake Mix Cookies
- Strawberry Cake Mix Cookies with White Chocolate
- Festive Cake Mix Christmas Cookies
Did you love these St. Patrick’s Day cookies? Let us know your thoughts in the comments below.

Pot of Gold Cookies
Ingredients
Cookies
- 1 (15.25 ounce) box of cake mix
- ½ cup canola or vegetable oil
- 2 large eggs
Frosting
- ¾ cup unsalted butter room temperature
- 1 ½ teaspoon vanilla extract
- ¼ teaspoon salt
- 3 cups powdered sugar
- 1-3 tablespoons milk or heavy cream
- yellow or gold food color
- green food color
Decorations
- 18 Reese’s miniature cups unwrapped
- edible gold spray or luster dust optional
- ¼ cup gold candy sequins or round gold sprinkles
- ⅓ cup green sanding sugar optional
- 5-6 rainbow sour belts cut into 1 ½ inch strips
Instructions
Cookies
- Preheat the oven to 350 degrees F.
- Line two large baking sheets with parchment paper and set aside.
- Mix the cake mix, oil, and eggs in a large bowl until well combined.
- Drop scoops of dough onto the prepared baking sheets using a medium cookie scoop, leaving at least two inches between each cookie.
- Bake for 10-12 minutes or until the edges are lightly golden.
- Allow the cookies to cool on the baking sheets for 5 minutes before transferring to a wire rack to finish cooling.
Frosting
- Beat the butter in a large bowl with a hand or stand mixer until smooth and creamy.
- Add the vanilla, salt, and 1 cup of powdered sugar and beat until well combined. Add the remaining powdered sugar 1 cup at a time, beating well after each addition.
- Add the milk ½ tablespoon at a time until the desired consistency is reached.
- Remove ¼ cup of the frosting and transfer it to a small bowl. Add a few drops of yellow or gold food color and mix until well combined.
- Add a few drops of green food color to the remaining frosting in the large bowl and beat until well combined.
Decorating
- Arrange the Reese’s cups on a parchment-lined baking sheet, leaving an inch or two between each cup.
- Spray the top and sides of the Reese’s cups with the gold spray and set aside to dry.
- Once the gold spray has dried, spread a small amount of gold frosting over the top of the Reese’s cups and dip them in the gold candy confetti to create the pot of gold.
- Frost each of the cookies with a layer of green frosting and sprinkle the sanding sugar over the top.
- Place a pot of gold in the center of each cookie.
- Gently press the short side of the rainbow belt into the pot of gold. Drape the rainbow belt in an arch shape over the side of the pot of gold and into the frosted cookie to create the rainbow.
- Allow the frosting to set before serving and enjoying.
Notes
- Store leftovers in an airtight container at room temperature for up to five days.
- The cookies can be frozen for up to three months. The cookies should be stored in a single layer so the decorations do not get ruined. Thaw the cookies at room temperature before enjoying them.
Disclaimer: Nutrition information is estimated based on automated calculations and should be considered as an approximation. These estimates are provided as a courtesy. Please use your own brand’s nutritional values to verify accuracy.