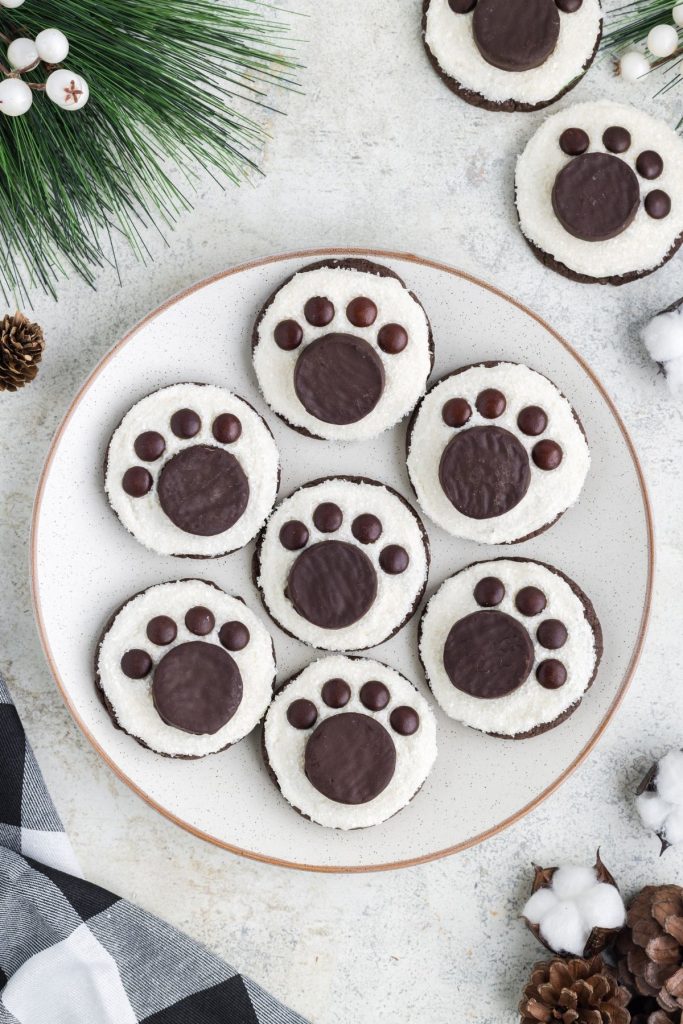
Polar Bear Paw Cookies


These Polar Bear Paw Cookies are soft, chewy chocolate cookies made from cake mix and topped with creamy vanilla frosting, white sanding sugar, and fun candy details.

Easy Bear Paw Cookies
I love using cake mix cookie bases like I did for my Polar Bear Face Cookies and Snowman Face Cookies because they’re so reliable and easy to build on. These Polar Bear Paw Cookies start with a soft, chewy chocolate version that’s quick to make and perfect for baking with my niece and nephew. I love recipes that lets us focus on the fun part—decorating—without spending too much time mixing and measuring.
The simple candy decorations turn these into something playful without a lot of effort. The sanding sugar adds a snowy touch, and placing the peppermint patties and M&Ms feels more like a craft than a recipe, which is exactly the kind of kitchen project I love during the winter.

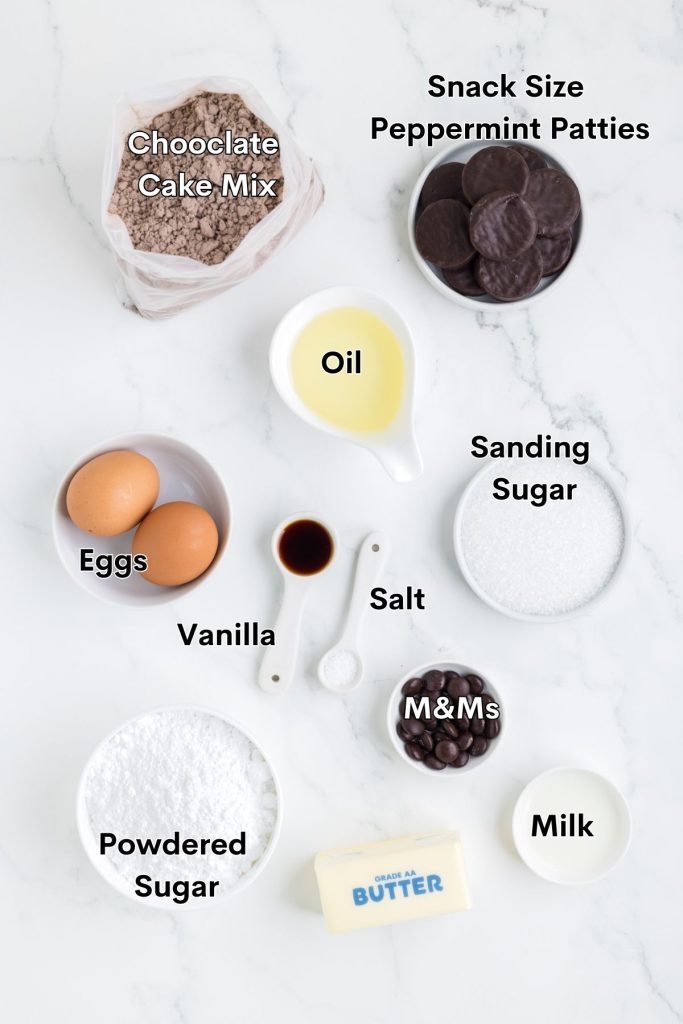
Ingredients
Chocolate cake mix – Serves as the base for the cookies. Use your favorite here. I used Duncan Hines as usual.
Canola or vegetable oil – Adds moisture and helps bind the dough.
Eggs – Give structure and help the cookies set as they bake.
Butter – Creates a smooth, creamy base for the frosting.
Powdered sugar – Sweetens and thickens the frosting.
Vanilla extract – Adds warm flavor to the frosting.
Salt – Balances the sweetness in the frosting.
Milk – Adjusts the texture of the frosting to make it spreadable.
White sanding sugar – Adds sparkle and a snowy look to the frosted cookies.
Peppermint patties – Form the main pad of each paw print.
M&Ms – Create the toe pads to complete the paw design.
Making Cake Mix Cookies
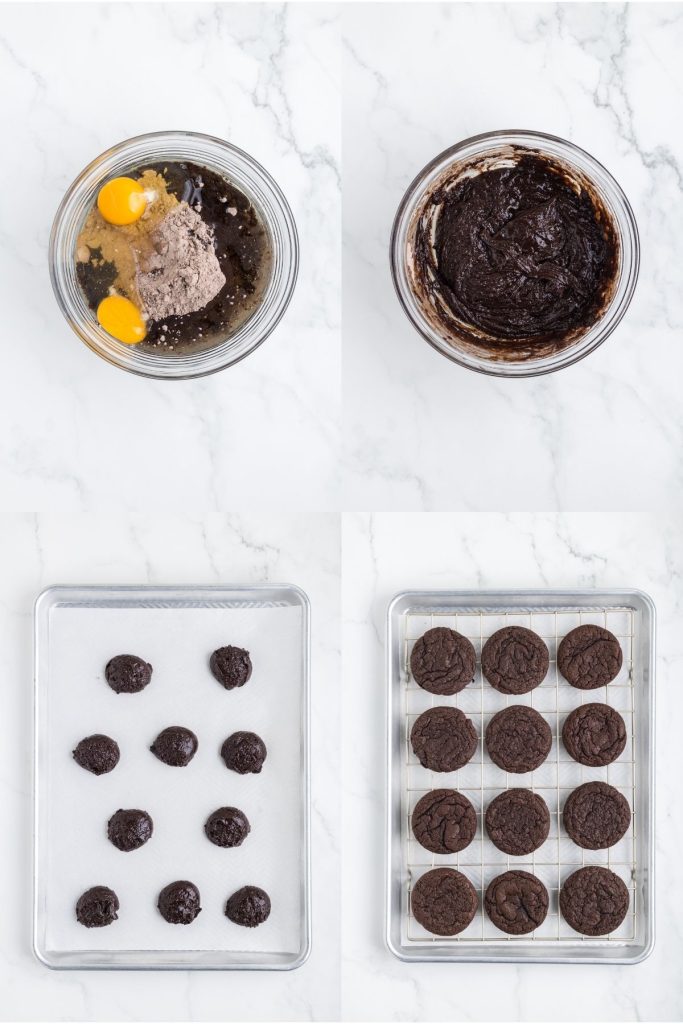
- Prep – Preheat your oven to 350 degrees F and line two baking sheets with parchment paper.
- Make the dough – In a large bowl, mix the chocolate cake mix, oil, and eggs until a thick dough forms.
- Scoop and bake – Scoop tablespoon-sized portions of dough onto the prepared baking sheets, spacing them about 2 inches apart. Bake for 9–11 minutes, or until the edges are set. Let cool completely on the baking sheet.
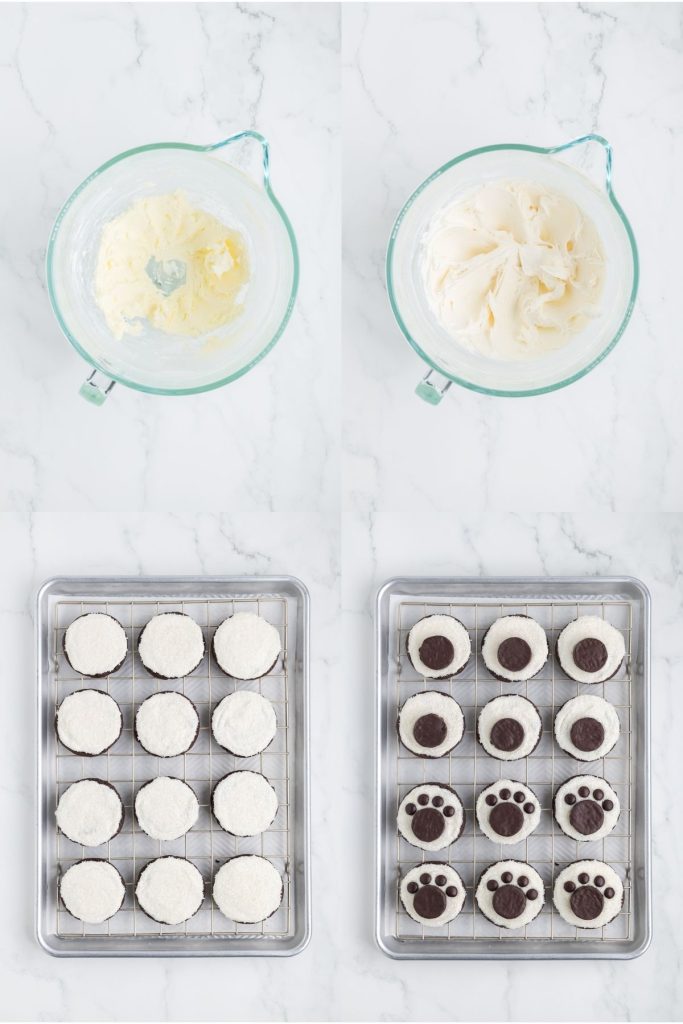
- Make the frosting – In a medium bowl, beat the butter until smooth. Add the powdered sugar, vanilla, salt, and ½ tablespoon of milk. Beat until fluffy, adding more milk as needed for spreadable consistency.
- Frost and decorate – Spread a layer of frosting on each cooled cookie, then immediately dip the tops in white sanding sugar.
- Add the paw print – Press one peppermint patty near the bottom center of each cookie, then place four brown M&Ms above it to form the toes.
Variations and Substitutions
- Change up the cookie flavor – Use a different flavored cake mix for the cookie base. Yellow cake, white cake, and vanilla cake will all work well.
- Homemade cookies – Use your favorite homemade chocolate cookie instead of the cake mix cookies. You want the cookie to be around 3 1/2 inches in diameter.
- Store-bought frosting – Make assembling these cookies even easier, and grab a tub of white frosting from the store to use instead of the homemade frosting.
- Candy toes – Brown Reese’s Pieces or Junior Mints can be used to create the toes instead of the M&Ms. Note that Reese’s pieces are slightly smaller than M&Ms, and the Junior Mints are larger, so the look will be different if you use either of these.
- Coconut fur – Instead of the white sanding sugar, dip the frosted cookies in sweetened shredded coconut to create the fur.
Tips for Success
- Don’t overbake the cookies – The cookies should look slightly soft in the center when they come out; they’ll firm up as they cool.
- Cool completely before frosting – If the cookies are even a little warm, the frosting will melt and the decorations won’t stay in place.
- Use a small offset spatula – This makes it easier to spread the frosting smoothly without tearing the cookies.
- Applying the ‘fur’ – I find dipping the frosted cookie in the sanding sugar is the easiest way to evenly coat the cookie. Add an even layer of sanding sugar to a small plate, press the frosted cookie into the surface of the sugar, shake off any excess, and voila, you have a beautifully coated cookie!

Want to be the first to know when the next brownie recipe is published? Sign up for our newsletter updates below.
More Chocolate Cake Mix Cookie Ideas
If you love how easy cake mix cookies are, here are more fun ways to turn a simple box mix into something delicious.
Did you love the black forest brownies using brownie mix? Please leave a star rating and share your thoughts in the comments below.

Polar Bear Paw Cookies Recipe
Ingredients
Cookies
- 1 (15.25 ounce) box of chocolate cake mix
- ½ cup canola or vegetable oil
- 2 large eggs
Frosting
- ¾ cup unsalted butter room temperature
- 2 ¼ cups powdered sugar
- 1 teaspoon vanilla extract
- pinch of salt
- ½-2 tablespoons milk
Decorations
- ½ cup white sanding sugar
- 16 snack-size peppermint patties
- 64 brown M&Ms
Instructions
Cookies
- Preheat the oven to 350 degrees F. Line two baking sheets with parchment paper.
- Mix the cake mix, oil, and eggs in a large bowl until well combined.
- Scoop the cookie dough onto the baking sheets using a 3-tablespoon cookie scoop leaving at least two inches between scoops.
- Bake for 9-12 minutes or until the edges of the cookies are set.
- Allow the cookies to cool on the baking sheet for 5 minutes before moving them to a wire rack to finish cooling.
Frosting
- Beat the butter in a large bowl with a hand or stand mixer until light and fluffy.
- Scrape the sides of the bowl, add the powdered sugar, vanilla, and salt, and beat until well combined.
- Add the milk ½ tablespoon at a time until the desired consistency is reached. The frosting should be easy to spread onto the cookies but firm enough not to slide off the side.
Assembly
- Frost the cookies with a generous layer of frosting.
- Place the sanding sugar onto a small plate. Gently press the frosted side of the cookie into the sanding sugar to create an even coating.
- Apply a small smear of frosting on the bottom of the peppermint pattie and attach it to the lower third of the cookie to create the pad of the foot.
- Gently press four M&Ms above the peppermint pattie to create the toes.
- Allow the frosting to set for 15-30 minutes before serving.
Notes
- Store in an airtight container at room temperature for 2-3 days or in the refrigerator for up to five days. If you store the cookies in the fridge, the M&M toes will lose their sheen and may have a ‘cloudy’ appearance.
- Use your favorite chocolate cake mix for these cookies. I used Duncan Hines Dark Chocolate.
Nutrition
Disclaimer: Nutrition information is estimated based on automated calculations and should be considered as an approximation. These estimates are provided as a courtesy. Please use your own brand’s nutritional values to verify accuracy.
A fun cookie! My children will love these!
Aw, I love these cookies. I bet my young kids will be thrilled to eat them. Thank you for such an amazing recipe.
This is such a cute and fun recipe!
Well if this isn’t the cutest cookie recipe!!!! I love both the polar bear paw and the polar bear face….kids are sure to love these!