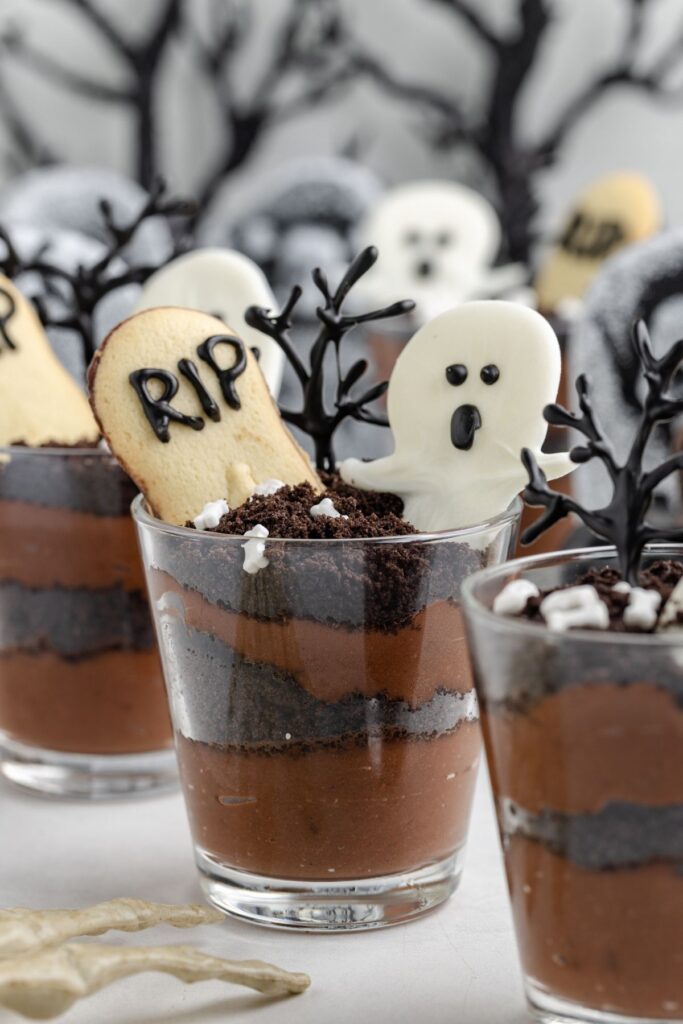
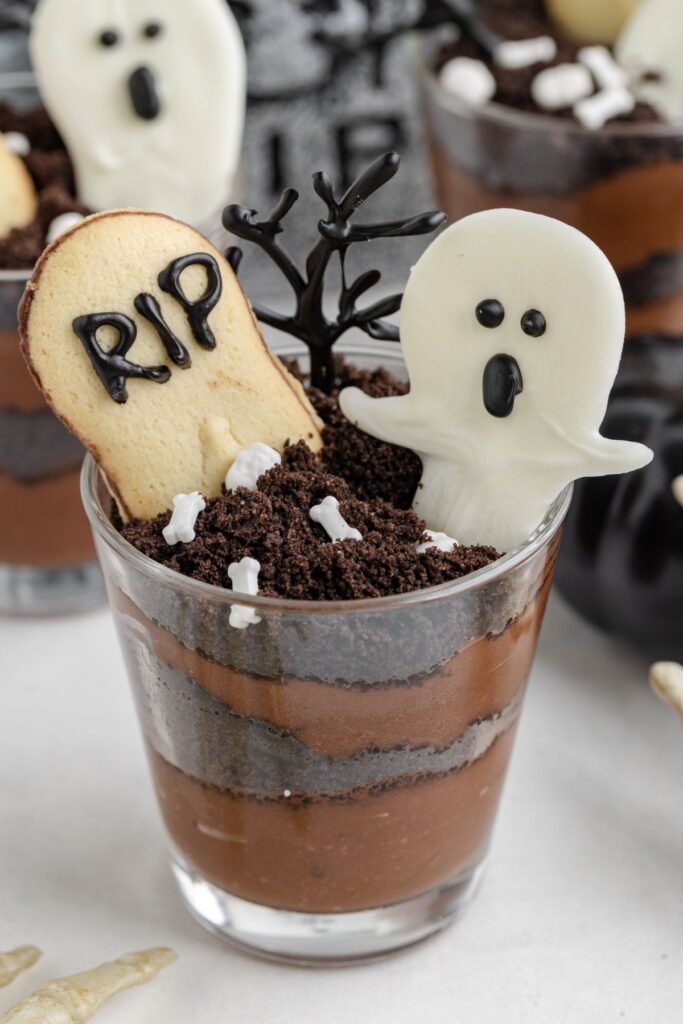
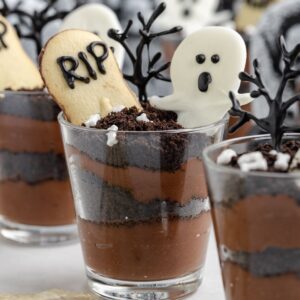
Halloween Graveyard Pudding Cups

These Halloween Graveyard Pudding Cups, with layers of chocolate pudding and cookie crumb dirt, are a fun and festive treat for the season. Topped with chocolate ghosts, cookie tombstones, and spooky trees, they’re perfect for Halloween parties and sure to be a hit with both kids and adults.
Easy Halloween Pudding Cups
I always have a blast making these decorations, and it’s so much fun seeing how each Graveyard Pudding Cup turns out a little different. They’re perfect for making with kids since they can get creative with the chocolate ghosts and spooky trees. Plus, let’s be honest, who doesn’t love a good chocolate pudding dessert?
Speaking of chocolate pudding desserts, check out my Easy Chocolate Mousse if you want a lighter option for filling the cups.
Simple Ingredients
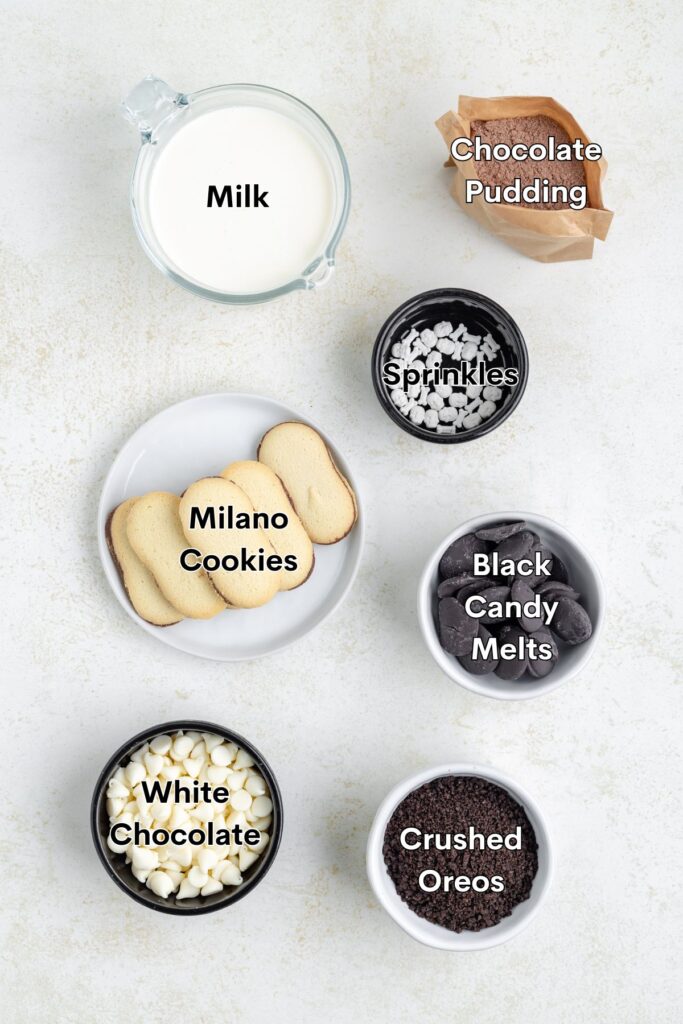
- White chocolate: Used to make the ghosts. You can use white candy melts or almond bark if you like. I just prefer the taste of white chocolate.
- Black candy melts: Used to create the trees, ghost facial features, and tombstone inscriptions.
- Milano cookies: Serve as the tombstones. Their firm texture makes them easy to decorate and stand upright.
- Instant chocolate pudding mix: Forms the base of the dessert.
- Milk: Mixes with the pudding to create the filling.
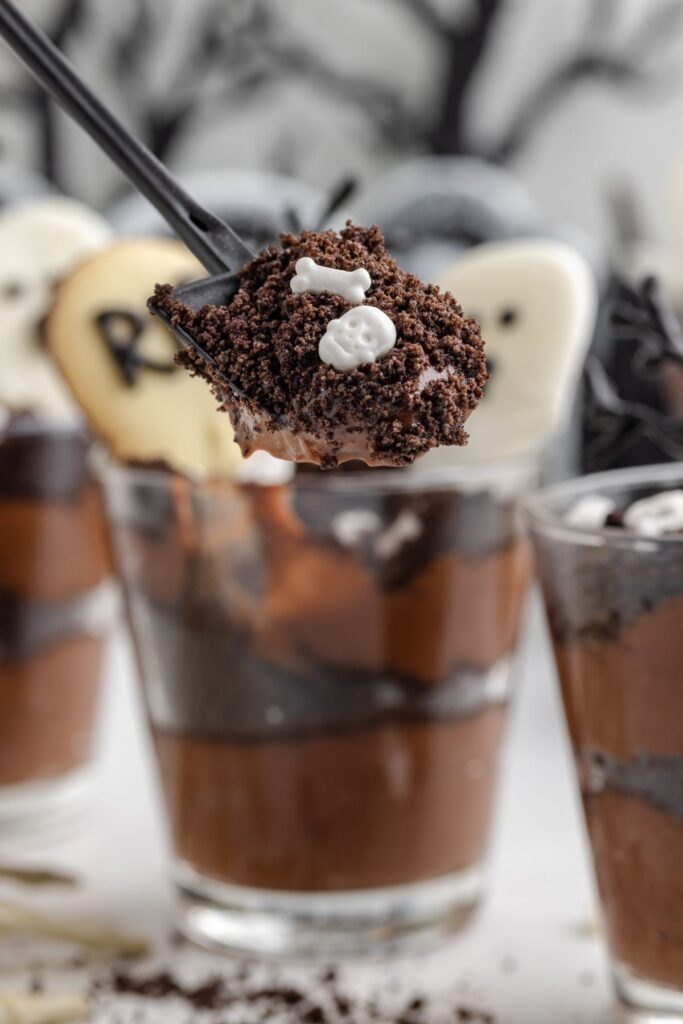
- Crushed chocolate sandwich cookies (Oreos): Used as the dirt topping.
- Halloween sprinkles (optional): To add more festive Halloween fun to the cups. I used cute skull and bone sprinkles to emphasize the graveyard theme.
Making the Dirt Pudding Cups
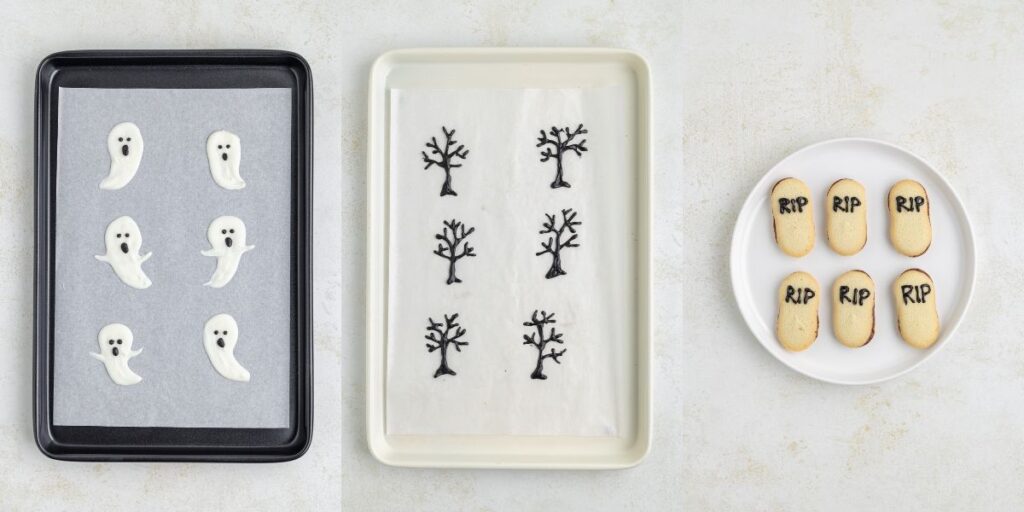
- Make the ghosts: Start by melting the white chocolate in a microwave-safe bowl, heating in 20-second intervals and stirring until smooth. Drop a heaped spoonful of the melted chocolate onto a parchment-lined tray, then use the back of the spoon to drag the bottom of the dollop down to create a ghost shape. If you want, use a toothpick to pull some of the chocolate out on each side to make arms. Let the ghosts set in the refrigerator while you prepare the rest.
- Add ghost faces: Melt the black candy melts according to the package directions. Transfer the melted candy to a piping bag with a small tip, then pipe eyes and mouths onto the white chocolate ghosts. Set them aside to harden fully.
- Create the trees and tombstones: Use the remaining melted black candy melts to pipe spooky tree shapes onto a tray lined with parchment paper and let them set. Use the black candy melts to pipe inscriptions onto the Milano cookies to create the tombstones. Allow everything to fully harden before assembly.
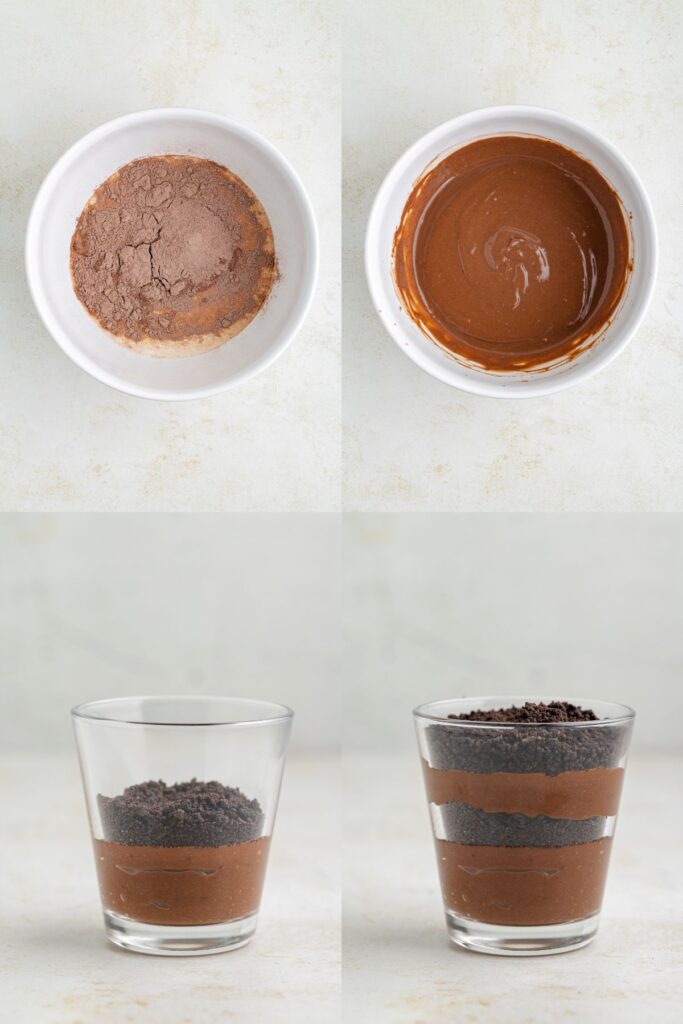
- Prepare the pudding: In a large bowl, whisk together the instant chocolate pudding mix and milk until smooth. Let it sit for about 5 minutes to thicken.
- Assemble: Start by adding a layer of pudding to the bottom of each serving cup, followed by a layer of Oreo cookie crumbs. Repeat with another pudding layer and finish with a final layer of Oreos.
- Refrigerate: Refrigerate the assembled cups for about an hour to allow the pudding to set.
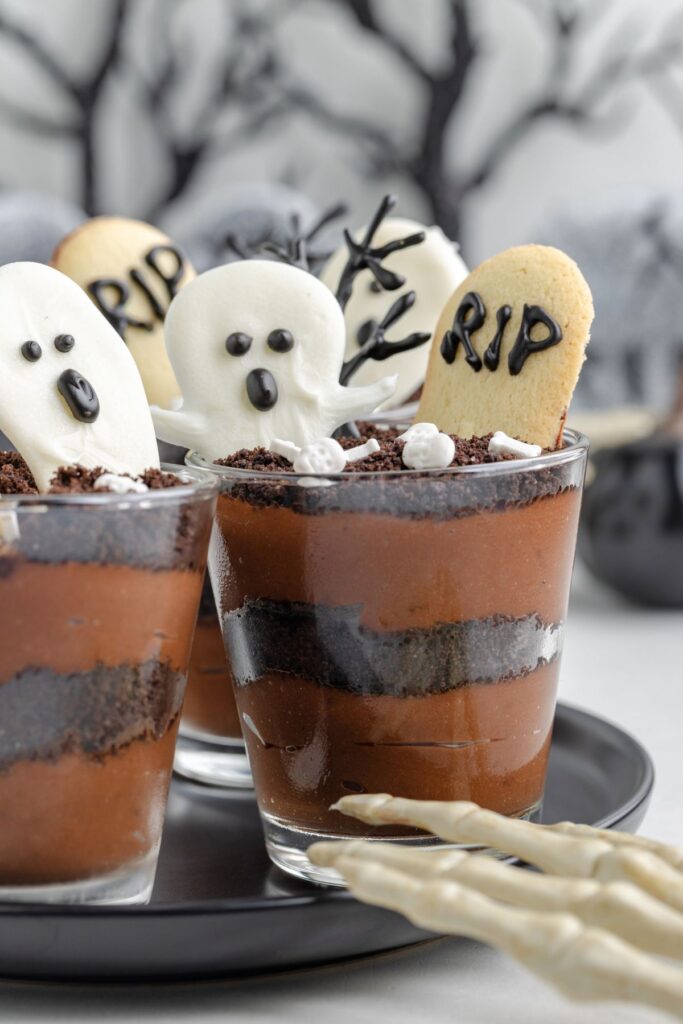
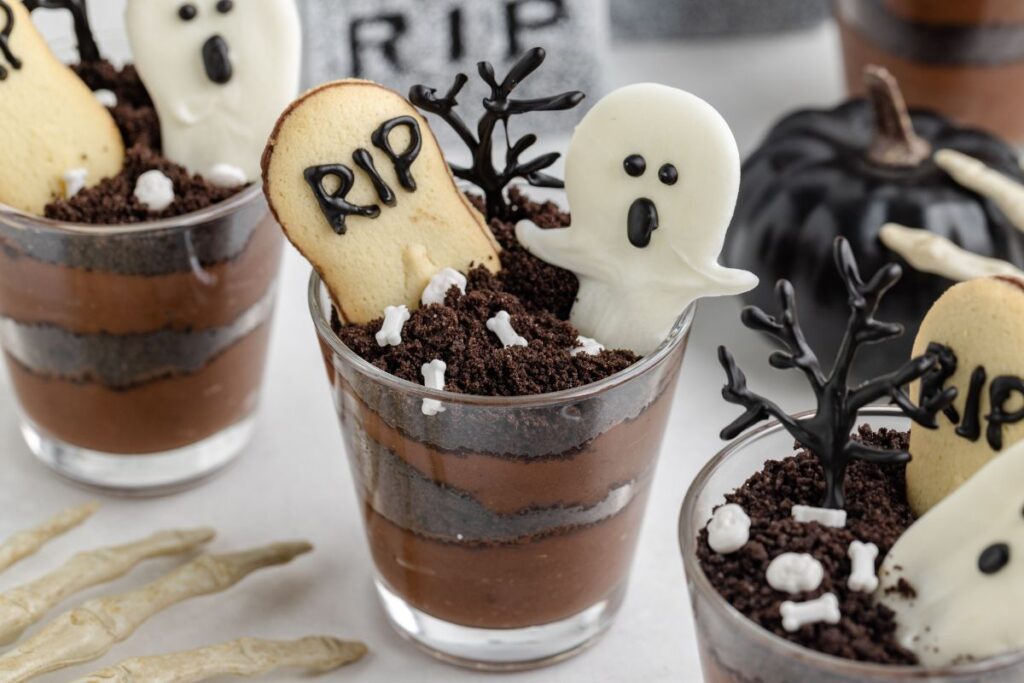
- Decorate and serve: When ready to serve, gently press a Milano cookie into each cup as the tombstone. Place a white chocolate ghost next to the tombstone and add a tree at the back for a spooky effect. Finish with sprinkles if using.
Variations and substitutions
Pudding: For a different flavor, you can substitute the chocolate pudding with vanilla or butterscotch pudding. To make it even more festive, you could use green food coloring in vanilla pudding to mimic a “slime” or “moss” effect. Use premade snack pack pudding cups to make these graveyard cups even easier.
White chocolate: If you prefer, you can use white candy melts or almond bark instead of white chocolate to make the ghosts. For a more colorful twist, try using colored candy melts.
Black candy melts: You can swap out the black candy melts with dark chocolate chips. You can also use edible markers to draw on the tombstones and add the ghost faces for better control.
Tombstone cookies: Any rectangular or oval-shaped cookie can be used for the tombstones. Graham crackers or chocolate wafer cookies also work well as an alternative.
Dirt: If you prefer, you can use chocolate graham crackers or even crushed chocolate cereal as a substitute for crushed Oreo cookies.
Decorations: Add other fun Halloween candies like gummy worms, candy corn, or candy pumpkin to enhance the spooky treat.
Tips for Success
- Piping the trees: When making the spooky trees, be sure to pipe a thicker base at the bottom. This will act as an anchor, making standing the trees in the pudding easier.
- Thicker pudding: When preparing the pudding, use slightly less milk than the package directions call for. This will create a thicker consistency, which helps the decorations stand up better.
- Cup size: The number of pudding cups you’ll make depends on the size of the cups you use. Smaller cups yield more servings, while larger cups yield fewer but more substantial portions.
- Timing: Prepare the decorations first so they have time to fully set before assembling the little dessert cups. This will ensure everything holds its shape when added to the pudding.
How to Store the Halloween Dirt Cups
Store the pudding cups covered well with plastic wrap or an airtight container in the refrigerator for up to 3 days. Store the decorations separately from the pudding until ready to serve.
Want to be the first to know when more delicious recipes are published? Sign up for our newsletter updates below.
Looking for more Halloween treats?
Check out these easy recipes.
Did you love this easy Halloween dessert? Let me know what you think in the comments below.
Halloween Graveyard Pudding Cups
Ingredients
- ⅔ cup white chocolate melted
- ½ cup black candy melts melted
- 6 Milano cookies
- 1 (3.9 ounce) box instant chocolate pudding mix
- 1 ¾ cups cold milk
- ½ – 1 cup crushed Oreos
- Halloween sprinkles optional
Instructions
- Melt the white chocolate in a microwave-safe bowl, heating in 20-second intervals and stirring until smooth. Drop heaped spoonfuls of melted chocolate onto a parchment-lined tray, then use the back of the spoon to drag the bottom of the dollops down to create a ghost shape. Use a toothpick to pull some of the chocolate out on each side to create arms if desired. Let the ghosts set in the refrigerator.
- Melt the black candy melts according to package directions. Transfer the melted candy to a piping bag with a small tip, then pipe eyes and mouths onto the white chocolate ghosts. Set them aside to fully harden.
- Using the remaining black candy melts, pipe spooky tree shapes onto parchment paper, making sure to create a thicker base to act as an anchor. Let the trees set completely. Use the melted black candy to pipe inscriptions onto the Milano cookies to create tombstones.
- In a large bowl, whisk together the instant chocolate pudding mix and cold milk until smooth. Let the pudding sit for a few minutes to thicken.
- Assemble the pudding cups by adding a layer of pudding to the bottom of each serving cup, followed by a layer of crushed Oreos. Repeat with another layer of pudding and finish with a final layer of Oreos. Refrigerate the assembled cups for about an hour to allow the pudding to set.
- When ready to serve, gently press a Milano cookie into each cup as the tombstone. Place a white chocolate ghost next to the tombstone and add a tree at the back. Add the halloween sprinkles.Serve and enjoy!
Notes
- Store the pudding cups covered well with plastic wrap or an airtight container in the refrigerator for up to 3 days. Store the decorations separately from the pudding until ready to serve.
Nutrition
Disclaimer: Nutrition information is estimated based on automated calculations and should be considered as an approximation. These estimates are provided as a courtesy. Please use your own brand’s nutritional values to verify accuracy.