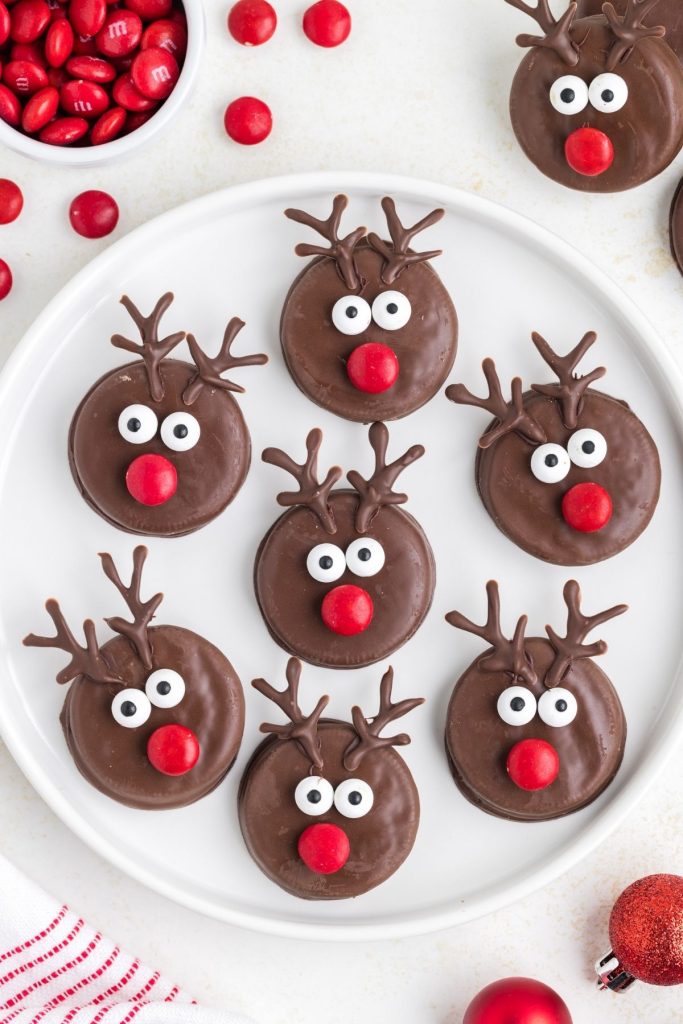
Fudge Covered Oreo Reindeer Cookies

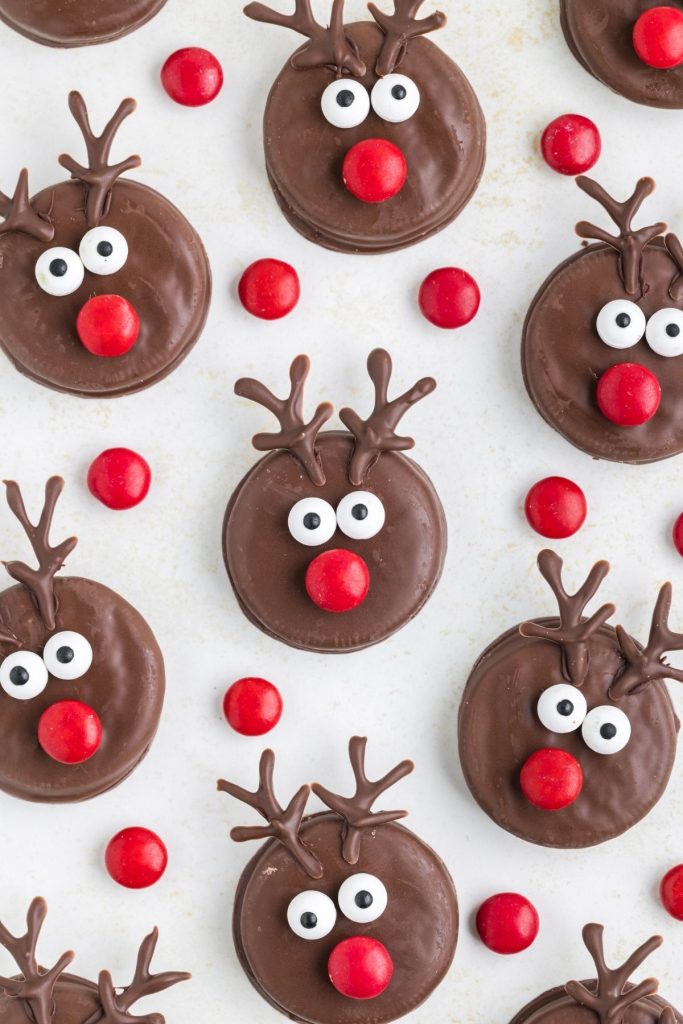
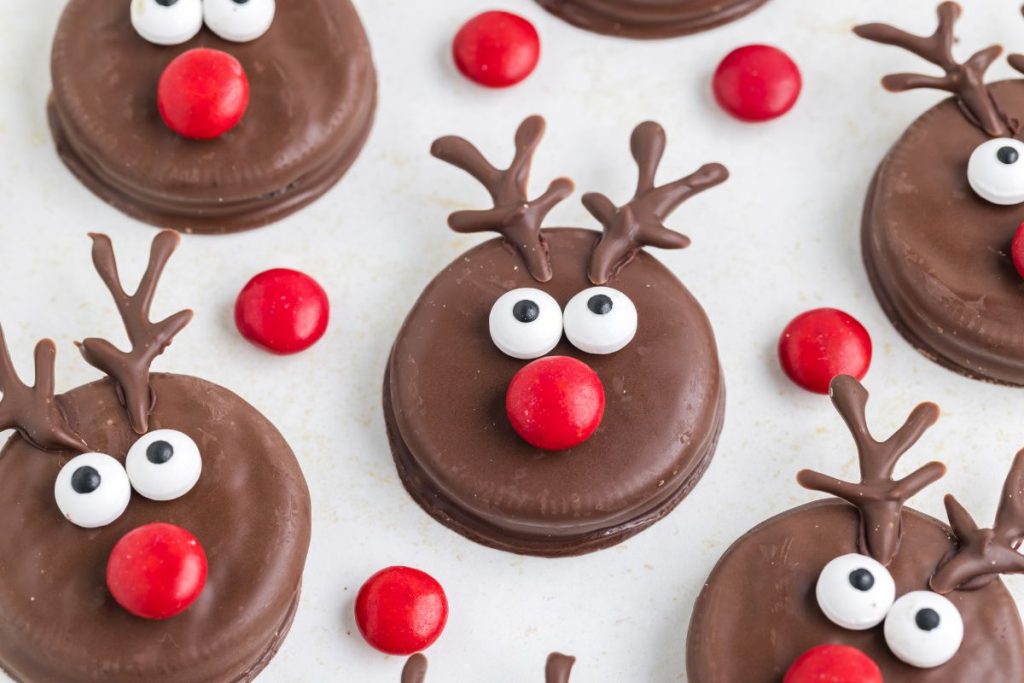
These fudge covered Oreo reindeer cuties sport piped chocolate antlers, candy eyes, and a charming red candy nose. With just four ingredients, they are an easy holiday treat to add to your festive dessert lineup.
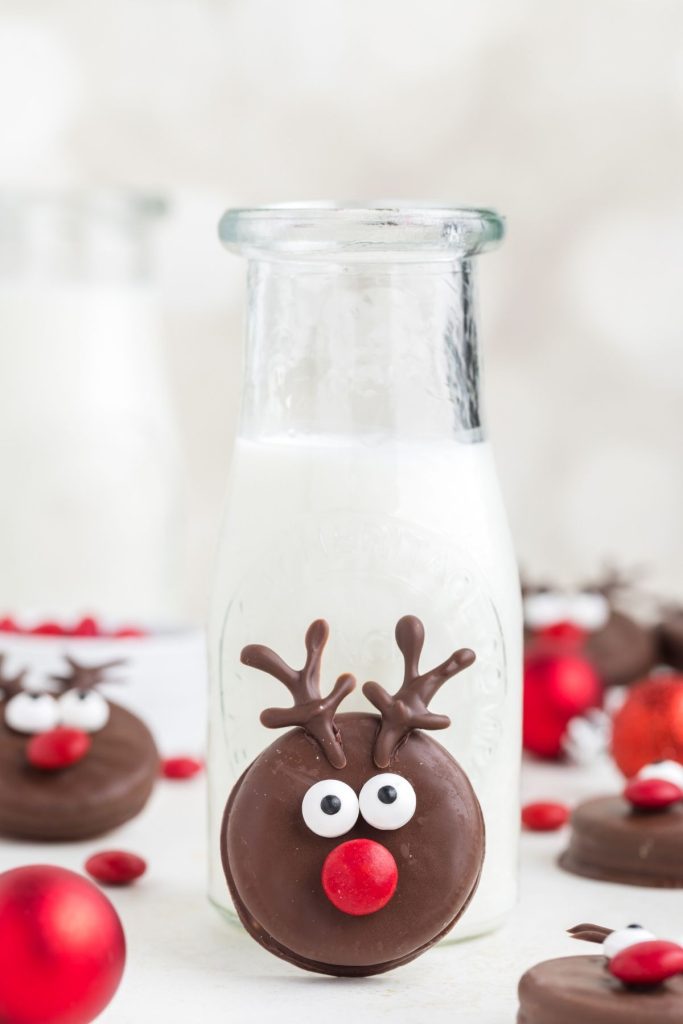
I absolutely love the simplicity of using store-bought Fudge Covered Oreos as the base for these adorable no-bake reindeer treats. It’s the ultimate shortcut to cuteness without sacrificing flavor. Reindeer are hands down the cutest Christmas characters, and making these sweet little cookies brings me pure joy. They’re not just a great addition to your dessert lineup; they also make the perfect gift and are sure to add extra fun to any gathering during the holiday season. Who knew creating festive holiday cheer could be this easy and delicious?
If you agree that Reindeer are absolutely adorable, check out my Easy Reindeer Cupcakes and Chocolate Pretzel Reindeer.
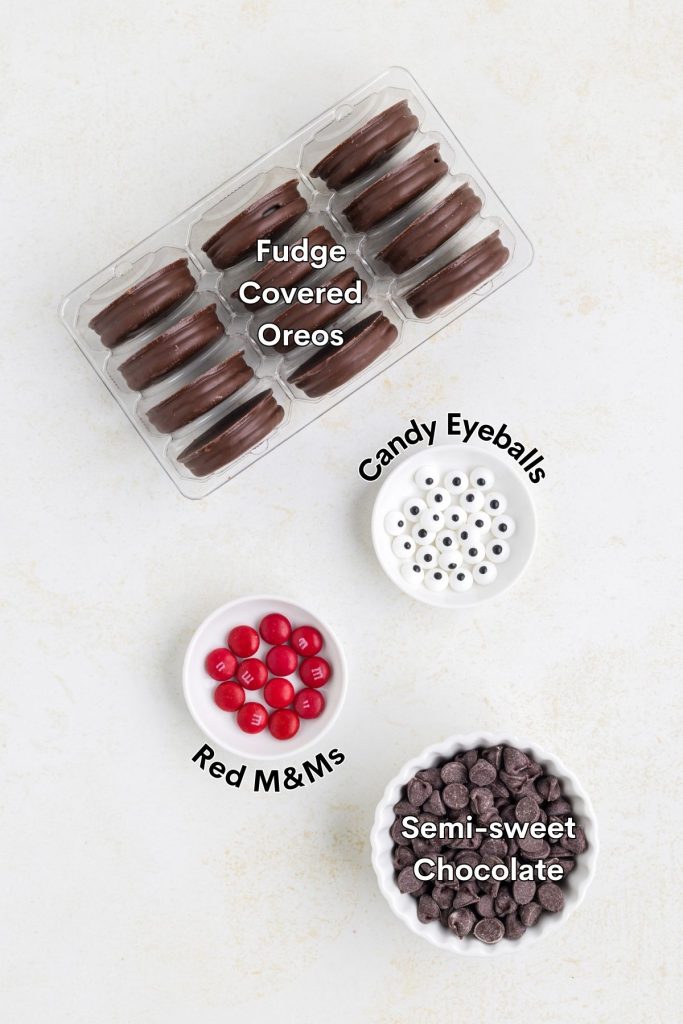
Ingredients for the Fudge Covered Oreo Reindeer Cookies
- Packet of fudge covered Oreos – A delicious base for our treats. The fudge coating provides a nice smooth surface to create the face.
- Semi-sweet chocolate – Used for crafting those adorable chocolate antlers and ensuring that our candy features stick securely to the cookies.
- Red M&Ms – Act as charming red noses, adding festive color and a delightful crunch.
- Candy eyeballs – The finishing touch for an irresistibly cute reindeer face.
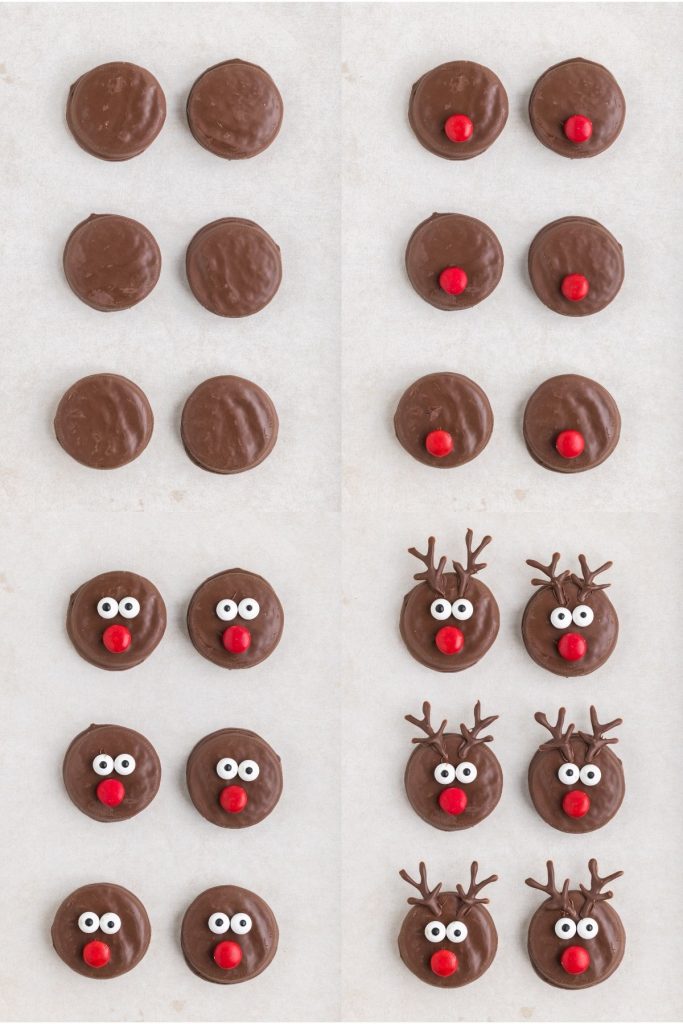
Making the Reindeer Oreo Cookies
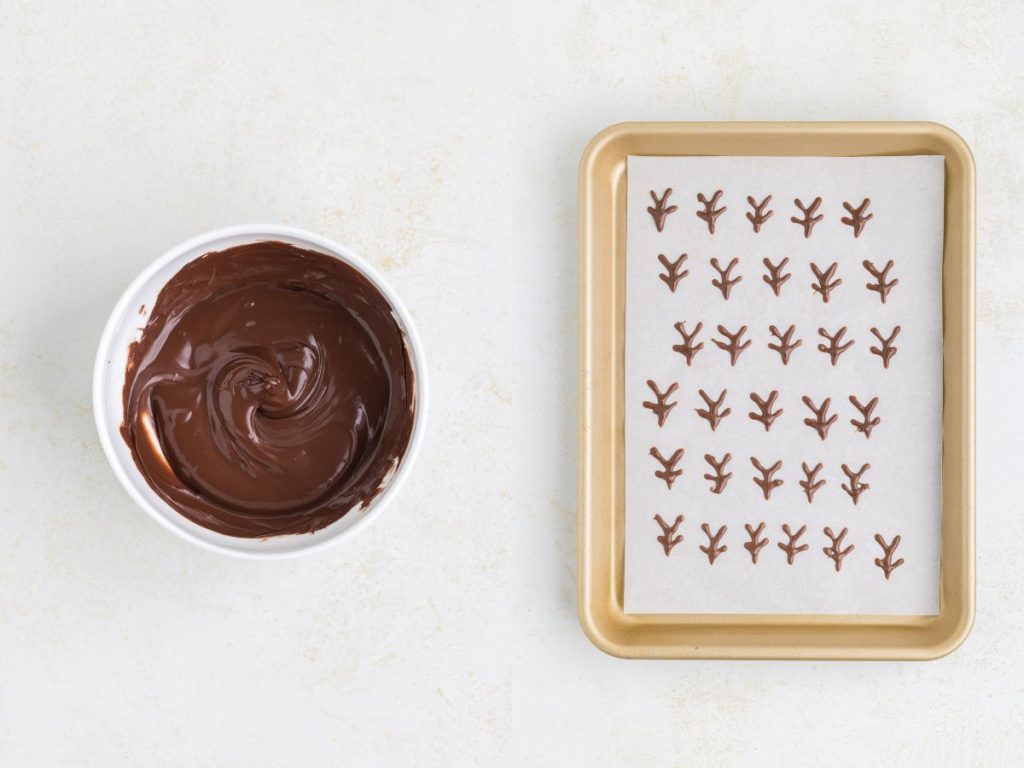
- Preparation – Line a large cookie sheet with parchment paper for easy and add the chocolate to a microwave-safe bowl.
- Melt chocolate – Melt the chocolate chips in the microwave in 20-second increments, stirring after each interval until smooth.
- Create Antlers -Transfer all but 1 tablespoon of melted chocolate into a piping bag fitted with a small tip, such as the Wilton 5 tip. Pipe 1-inch antlers onto the prepared baking sheet, creating a ‘Y’ shape and adding additional lines to each side of the stem. Refrigerate the antlers for 10-15 minutes until completely set.
- Assemble the reindeer – Arrange the Fudge Covered Oreos in a single layer on a baking sheet or large plate. Reheat the reserved chocolate for 10-20 seconds until smooth.
- Add the nose – Using a toothpick, apply a small dab of melted chocolate to the bottom of a red M&M and attach it to the bottom third of an Oreo to create the reindeer nose.
- Attach eyes – Apply a small amount of chocolate to two candy eyes and attach them above the nose.
- Apply antlers – Complete the reindeer by spreading a small amount of melted chocolate to the back of two chocolate antlers and affixing them to the top of the Oreo. Repeat the process with the remaining Oreos.
- Set and enjoy – Allow the cookies to set at room temperature for 20-30 minutes to ensure the features are securely in place before indulging in these festive delights.
Variations and substitutions
Cookie base – Explore different cookie options such as Fudge Covered Nutter Butters, Ritz crackers, or other fudge-covered cookies. If you want to stick with Oreos but can’t find the fudge covered ones, use regular Oreos instead.
DIY chocolate Oreos – If Fudge Covered Oreos are unavailable, coat regular Oreos with melted chocolate, chocolate wafers, or chocolate almond bark for a homemade alternative. Dip each cookie in the chocolate coating, tap off the excess chocolate, let it set, and proceed with creating your adorable holiday reindeer.
Antlers – Experiment with different shapes and sizes for the antlers. Use milk or white chocolate chips for a color variation or use mini pretzels for a salty-sweet flavor.
Nose – Substitute red M&M candies with other candies like red Sixlets, jelly beans, Skittles, or Red Hots Wilton also has cinnamon drop sprinkles that they release around the holidays that work great.
Eyes – Experiment with larger or smaller size eyes for a different look. You can also use large black sprinkles instead of candy eyes or even edible markers to draw eyes directly on the cookie.
Decorations – Add sprinkles, edible glitter, or colored sugar to the melted chocolate antlers before they set for extra festive flair. You can even spray or brush the antlers with edible gold or silver dust for a touch of elegance.
Gluten-free version – Make a gluten-free version of these fun cookies by dipping gluten-free Oreos in chocolate. Ensure that the candy eyes and nose you select are also gluten-free. The Wilton brand candy eyes and M&Ms I used in my version are gluten-free.
Tips for success
- Consistent chocolate melting – When melting chocolate, use short intervals in the microwave and stir well after each to ensure even melting and prevent seizing and burning.
- Antler piping – For smooth antler piping, ensure the chocolate is at the right consistency – not too thick or too thin. If the chocolate becomes too thick, add a small amount of vegetable shortening or oil and stir until smooth.
- Make spares – Pipe more antlers than needed to account for any breakage during assembly. Having extras ensures a smooth and stress-free decorating process.
- Setting features – Allow each component, like the nose and eyes, to set briefly before moving on to the next step. This ensures they adhere properly and maintain their shape.
- Room temperature setting – Allow the cookies to set at room temperature rather than in the fridge. Refrigeration can cause candy eyeballs to bleed and M&Ms to become cloudy, so a room-temperature setting helps preserve the vibrant colors and overall presentation.
- Preparation efficiency – Have all ingredients and tools ready before starting. This includes preparing the piping bag and laying out the cookies. It streamlines the process and prevents interruptions, which may cause the chocolate to harden before you finish.

Storage
Store in an airtight container at room temperature in a cool place for up to two weeks. Be careful if stacking the cookies so you don’t break the chocolate antlers.
I do not recommend freezing these cookies as the moisture will make the candy eyes run, and the M&Ms will have a cloudy appearance.
Fudge Covered Oreo Reindeer Cookies FAQs
Yes, you can! In fact, it is recommended to ensure the features have time to set before serving. Store the finished cookies in a cool, dry place in an airtight container to maintain freshness.
To prevent antlers from breaking during assembly, it’s crucial to ensure that the chocolate used for piping is of a sturdy consistency—neither too thin nor delicate. Aim for a thickness that provides structural integrity. Additionally, be mindful of the antler length; overly long antlers are more prone to breakage, so piping them to a moderate size contributes to their overall durability during the decorating process.
Want to be the first to know when new recipes are released? Sign up for our newsletter updates below.
Looking for more easy Christmas Treats?
Check out these recipes.
Love this fun recipe for reindeer Oreos? Let us know your thoughts in the comments below.

Fudge Covered Oreo Reindeer Cookies
Ingredients
- 1 (12 count) packet of Fudge Covered Oreos
- 1/3 cup semi-sweet chocolate
- 12 red M&Ms
- 24 candy Eyeballs
Instructions
- Line a large baking sheet with parchment paper.
- Melt the chocolate chips in the microwave in 20-second increments, storing after each interval until smooth.
- Add all but 1 tablespoon of the chocolate to a piping bag fitted with a small tip (I used the Wilton 5 tip).
- Pipe I inch antlers onto the prepared baking sheet. I find it easiest to pipe a ‘Y’ shape, then add another line to each side of the stem of the Y. Refrigerate the antlers for 10-15 minutes or until completely set.
- Arrange the Oreos in a single layer on a baking sheet or platter.
- Microwave the leftover chocolate for 10-20 seconds or until smooth and melted again.
- Use a toothpick to apply a small dab of melted chocolate to the bottom an M&M and attach it to the bottom third of an Oreo to create the nose.
- Apply a small amount of chocolate to two candy eyes and attach them above the nose.
- Finally, spread a small amount of melted chocolate to the back of two chocolate antlers and add them to the top of the cookie to complete the reindeer.
- Repeat with the remaining Oreos. Allow the cookies to set at room temperature for 20-30 minutes to ensure the features are secure before enjoying.
Notes
- Store in an airtight container at room temperature in a cool place for up to two weeks. Be careful if stacking the cookies so that you don’t break the chocolate antlers.
- I do not recommend freezing these cookies as the moisture will make the candy eyes run and the M&Ms have a cloudy appearance.
Disclaimer: Nutrition information is estimated based on automated calculations and should be considered as an approximation. These estimates are provided as a courtesy. Please use your own brand’s nutritional values to verify accuracy.