Easter Cookie Cups

These Easter cookie cups start with a simple sugar cookie base, filled with smooth buttercream, and topped with candy chocolate eggs. They’re a fun and easy treat, and you can customize them with your favorite candy eggs.

Easy Easter Cookie Cups
I have a confession—Cadbury Mini Eggs are my favorite candy of all time. I usually have to buy two bags when I plan to bake with them because I end up eating one before I even start. I’ve used them in all kinds of desserts, like these mini egg brownie cookies, but for these adorable nests, I went with Hershey’s candy-coated eggs because I like the vibrant colors more than Cadbury Mini Eggs.
I love cute Easter desserts, and these cookie Easter baskets definitely fit the bill. They start with refrigerated sugar cookie dough, which makes them super easy. The mini size makes them a great bite-sized treat for an Easter dessert display, and they’re perfect to make with kids. You don’t need any special skills—just bake the cookie cups, pipe in some buttercream, and pop on the candy eggs.

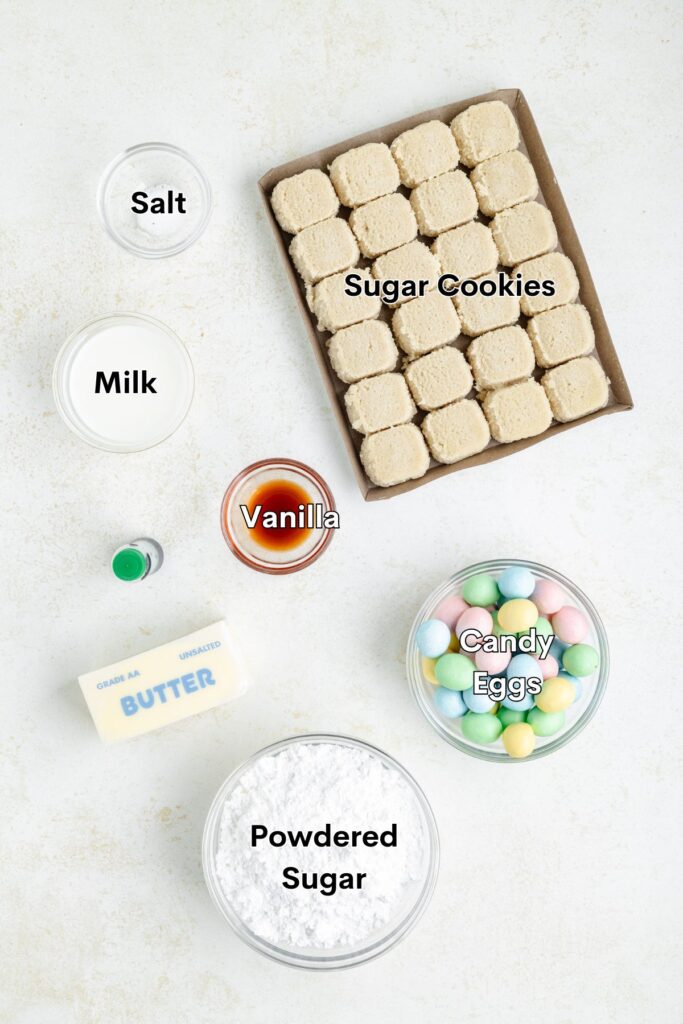
Ingredients
- Refrigerated sugar cookie dough – Forms the easy base of the cookie cups.
- Unsalted butter – Adds richness to the buttercream.
- Powdered sugar – Sweetens the buttercream and creates a fluffy texture.
- Vanilla extract – Adds vanilla flavor to the frosting.
- Salt – Balances the sweetness of the frosting.
- Milk – Adjusts the buttercream’s consistency.
- Green food coloring – Gives the buttercream a grass-like color for the nest effect.
- Candy chocolate eggs – The fun, colorful eggs for the nest.
Making the Easter Cookies
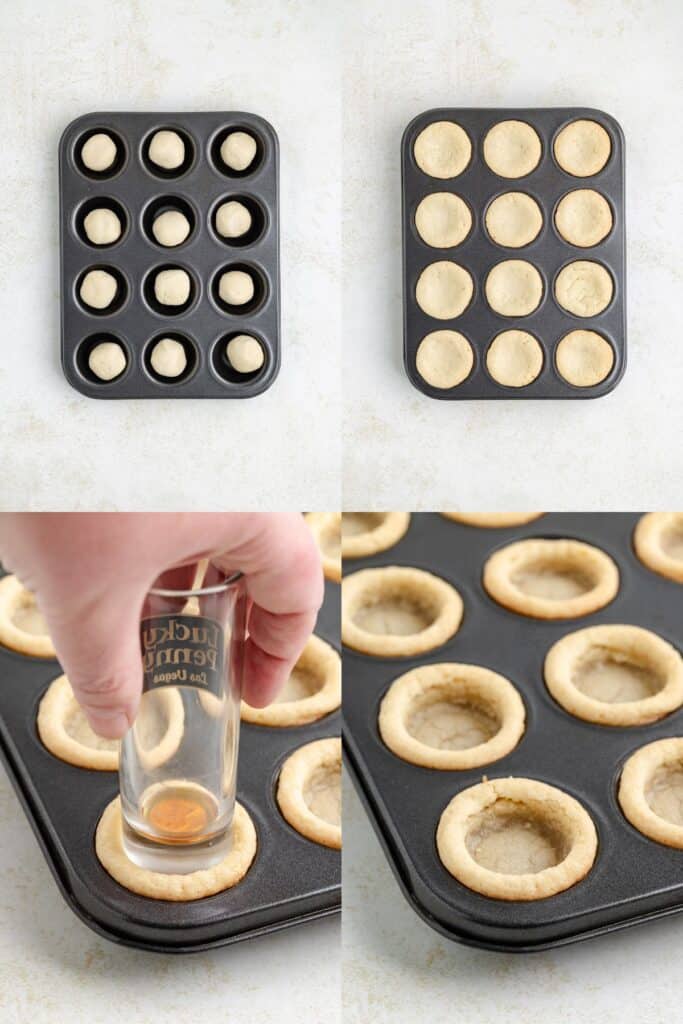
- Prep – Preheat the oven to 350 degrees F and grease a mini muffin tin.
- Bake – Place one portion of sugar cookie dough into each of the muffin cups. Bake for 15-18 minutes or until the edges are golden brown.
- Make the nest indentation – Immediately after baking, press the center of each baked cookie with a shot glass or the back of a measuring spoon to create a well. Let them cool for 5-10 minutes, then remove them while still slightly warm so they release easily. Transfer to a cooling rack to cool completely.
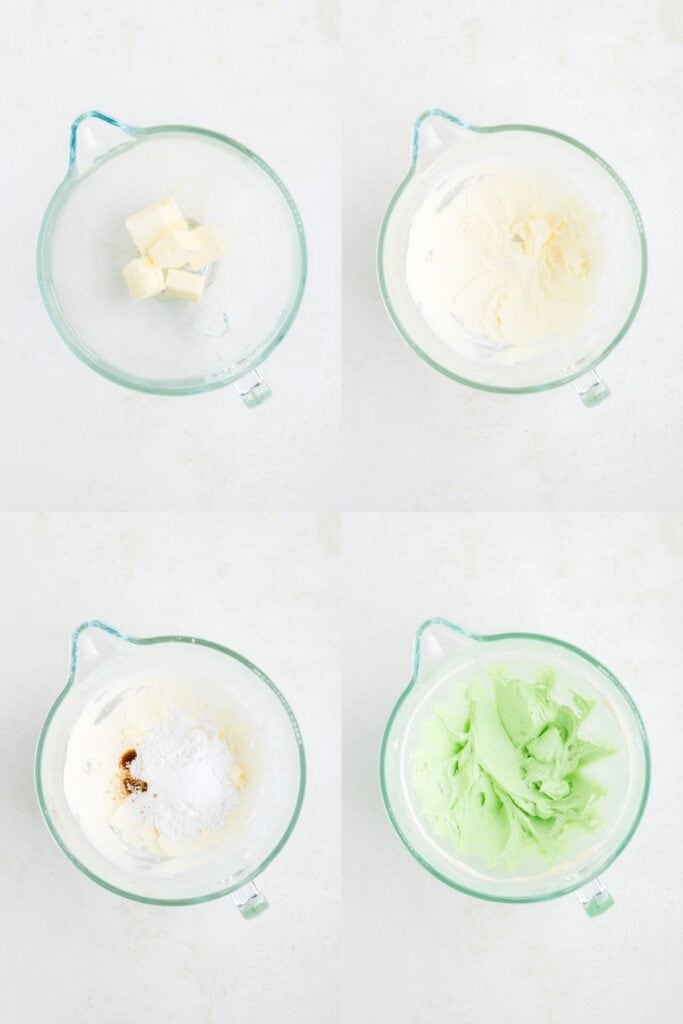
- Make the Buttercream – Beat the butter in a large bowl until smooth, then mix in the powdered sugar, vanilla, and salt. Add milk or heavy cream, a little at a time, until the frosting is smooth and pipeable. Mix in green food coloring until you reach your desired shade.
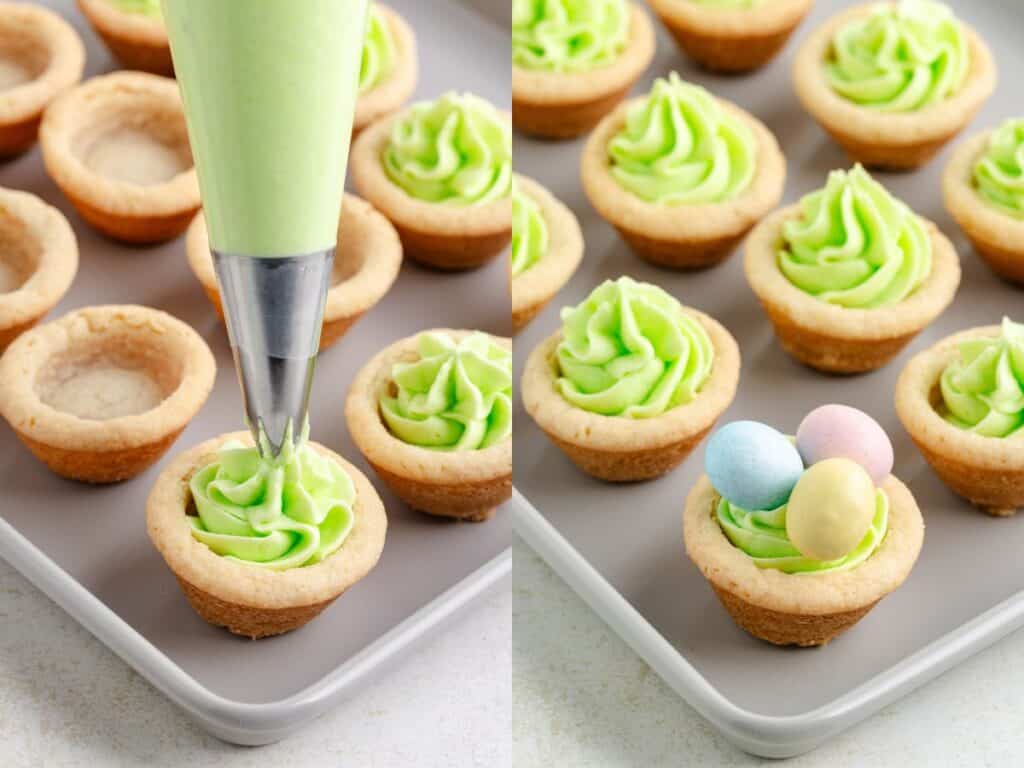
- Assemble the cookie cups – Pipe or spoon buttercream into each cooled cookie cup. Top with candy chocolate eggs, gently pressing them into the frosting so they stick.
Variations and Substitutions
- Cookie base – Use homemade sugar cookie dough instead of pre-made dough, or try a different cookie dough like chocolate chip or peanut butter for a twist.
- Buttercream flavor – Swap vanilla extract for almond, lemon, or coconut extract to change up the flavor or use cream cheese frosting.
- Frosting options – Use store-bought buttercream or an easier option.
- Egg options – Try different Easter candy like Robin’s eggs, malted milk eggs, or jelly beans for a fun variation.
- Shredded coconut – Sprinkle a little toasted or green-dyed shredded coconut on top of the frosting to make the nests look even more realistic.

Tips for Success
- Grease the muffin pan – Even if using a nonstick pan, lightly grease it to help the cookie cups release easily.
- Use a mini muffin pan – A regular sized muffin tin is too big for these cookie cups, so make sure to use a mini muffin pan for the right size.
- Don’t overbake – The cookie cups should be lightly golden around the edges. Overbaking can make them too crisp and harder to indent.
- Press the indentation while warm – Use a shot glass or the back of a measuring spoon to create the well as soon as they come out of the oven. If they cool too much, they’ll be harder to shape.
- Remove while slightly warm – Let the cookie cups cool for 5-10 minutes before removing them from the pan. Taking them out while they’re still slightly warm helps them release more easily.
- Adjust buttercream consistency – Add milk or heavy cream slowly to avoid making the buttercream too thin. If it’s too runny, add more powdered sugar to thicken it.
- Use a piping bag for a neater look – A piping bag with a tip will give the frosting a tidier appearance, but a spoon works fine too.

Storage
Store the cookie cups in an airtight container at room temperature for up to 2 days or in the refrigerator for 5 days. If your kitchen is warm, the buttercream may soften, so consider refrigerating them. Let them sit at room temperature for 15-20 minutes before serving to soften the buttercream.
Freeze undecorated cookie cups in an airtight container or freezer bag for up to 3 months. Thaw at room temperature before adding the buttercream and candy eggs. Buttercream can also be made ahead and frozen separately in an airtight container for up to 2 months—just let it thaw and rewhip before using.

Want to be the first to know when more cookie recipes are published? Sign up for our newsletter updates below.
Looking for more easy Easter treats?
Check out these easy recipes.
Did you love these Easter egg cookie cups? Please leave a star rating and share your thoughts in the comments below.

Easter Basket Cookie Cups
Ingredients
- 1 (16 ounce) package ready-to-bake refrigerated sugar cookie dough 24 count
- 3/4 cup unsalted butter softened
- 3 cups powdered sugar
- 1 1/2 teaspoon vanilla extract
- 1-3 tablespoons milk
- 1/4 teaspoon salt
- green food coloring
- 1 (9 ounce) bag of candy chocolate eggs
Instructions
- Preheat the oven to 350 degrees F and grease a mini muffin pan.
- Place one portion of sugar cookie dough into each muffin cup. Bake for 15-18 minutes or until the edges are lightly golden.
- Immediately after baking, press the center of each cookie cup with a shot glass or the back of a measuring spoon to create a well. Let them cool for 5-10 minutes, then remove them while still slightly warm so they release easily. Transfer to a wire rack to cool completely.
- Beat the butter until smooth, then mix in the powdered sugar, vanilla, and salt. Add milk or heavy cream, a little at a time, until the frosting is smooth and pipeable. Mix in green food coloring until you reach your desired shade.
- Pipe or spoon the green buttercream into each cooled cookie cup. Top with candy chocolate eggs, gently pressing them into the frosting so they stick.
Notes
- Store the cookie cups in an airtight container at room temperature for up to 2 days or in the refrigerator for 5 days. If your kitchen is warm, the buttercream may soften, so consider refrigerating them. Let them sit at room temperature for 15-20 minutes before serving to soften the buttercream.
- Freeze undecorated cookie cups in an airtight container or freezer bag for up to 3 months. Thaw at room temperature before adding the buttercream and candy eggs. Buttercream can also be made ahead and frozen separately in an airtight container for up to 2 months—just let it thaw and rewhip before using.
Nutrition
Disclaimer: Nutrition information is estimated based on automated calculations and should be considered as an approximation. These estimates are provided as a courtesy. Please use your own brand’s nutritional values to verify accuracy.